Flutter Testing
What is Flutter?
Flutter is a free and open-source mobile application development framework created by Google. It was released in 2017 and has gained popularity among developers due to its ability to build high-performance, visually appealing, and native-like apps for multiple platforms, including iOS, Android, web, and desktop, using a single codebase.
Flutter uses the Dart programming language, which was also developed by Google, and provides a rich set of pre-built widgets and tools that make it easy for developers to create beautiful and functional apps. The framework uses a reactive programming model.
One of the key advantages of Flutter is its hot reload feature, which allows developers to make changes to their code and see the results instantly in the app without needing to rebuild it from scratch. This helps to speed up the development process and enables developers to iterate quickly.
Flutter also comes with a powerful set of tools for debugging and testing, including support for unit tests, integration tests, and UI tests. This helps developers to ensure that their apps are bug-free and perform well on all platforms.
Flutter framework testing
Pre-Requisites
- Add test or flutter_test dependency in pubspec.yaml file
dev_dependencies:
flutter_test:
sdk: flutter -
Create a test file with a file name ending with _test.For example, to test a class validatecreds.dart, we need to name the test file validatecreds_test. Dart. The test file should be placed in the test folder located at the root of your Flutter application or package.
-
Create a class to test.For example, to test class validatecreds.dart, we need to create and place the class file in lib folder located at the root of your Flutter application or package.The folder structure should be as shown below:login_screen/
lib/
validatecreds.dart
test/
validatecreds_test.dart -
Write a test for the class.Example:test/
validatecreds_test.dart
Unit Testing
Unit testing is a technique where individual units or components of a software application are tested in isolation from the rest of the system. The purpose of unit testing is to validate that each component of the application is functioning as intended and to catch any defects or bugs early in the development cycle. Following the TDD approach for writing unit tests is a great practice in Flutter.
- Code level
- Widget Level
Below is an example of unit testing at code level:
dartCopy code
int addNumbers(int a, int b) {
  return a + b;
}

void main() {
  test('adds two numbers', () {
    expect(addNumbers(2, 3), equals(5));
    expect(addNumbers(-2, 3), equals(1));
    expect(addNumbers(0, 0), equals(0));
  });
}
In this example, we define an addNumbers function that takes two integer arguments and returns their sum. We then define a test case using the test function provided by the flutter_test package. The test case checks that the addNumbers function returns the expected result for three different input pairs.
Below is an example of unit testing at the widget level:
dartCopy code
import 'package:flutter/material.dart';
import 'package:flutter_test/flutter_test.dart';

void main() {
  testWidgets('displays greeting message', (WidgetTester tester) async {
    await tester.pumpWidget(GreetingWidget(name: 'John'));
    final greetingFinder = find.text('Hello, John!');
    expect(greetingFinder, findsOneWidget);
  });
}

class GreetingWidget extends StatelessWidget {
  final String name;

  GreetingWidget({required this.name});

  @override
  Widget build(BuildContext context) {
    return Text('Hello, $name!');
  }
}
In this example, we define a GreetingWidget class that takes a name argument and displays a greeting message with the name in a Text widget. We then define a test case using the testWidgets function provided by the flutter_test package. The test case uses the pumpWidget method to render the GreetingWidget with a specified name and then checks that the expected greeting message is displayed by searching for a Text widget with the expected text using the find.text function. The expect function then verifies that the Text widget is found exactly once using the findsOneWidget matcher.
Integration testing
Integration testing is a software testing technique that tests the interactions and interfaces between different modules or components of a software system. The purpose of integration testing is to ensure that the individual modules of the system work together as expected and to catch any defects or issues that may arise due to the interaction between different parts of the system.
- Using HTTP tests to perform integration testing at the API layer
- Integration testing can be performed at the user interface level (which can also be part of E2E testing)
- Integration testing can be performed at the database layer
Pre-requisites for integration testing
-
We need to add two packages in the dev dependencies section in the pubspec.yaml file.dev_dependencies:
integration_test:
sdk: flutter
flutter_test:
sdk: flutter - We need to group flow using 'group' keyword
- We cannot create integration tests in the 'test' folder. We need to create a folder with the name 'integration_test' where our integration scripts will be placed.
-
For API, we need to:
-
Add http client package in dependencies section in pubspec.yml.dependencies:
flutter:
sdk: flutter
http: 0.13.4 -
Add mockito and build_runner dependency in pubspec.yaml.dev_dependencies:
flutter_test:
sdk: flutter
mockito: ^5.1.0
build_runner: ^2.1.10
-
Example of an integration test on the API level
Suppose we want to validate a response for an API which should return a list of books. This means we need to create an API test class called fetch_books_test.dart.
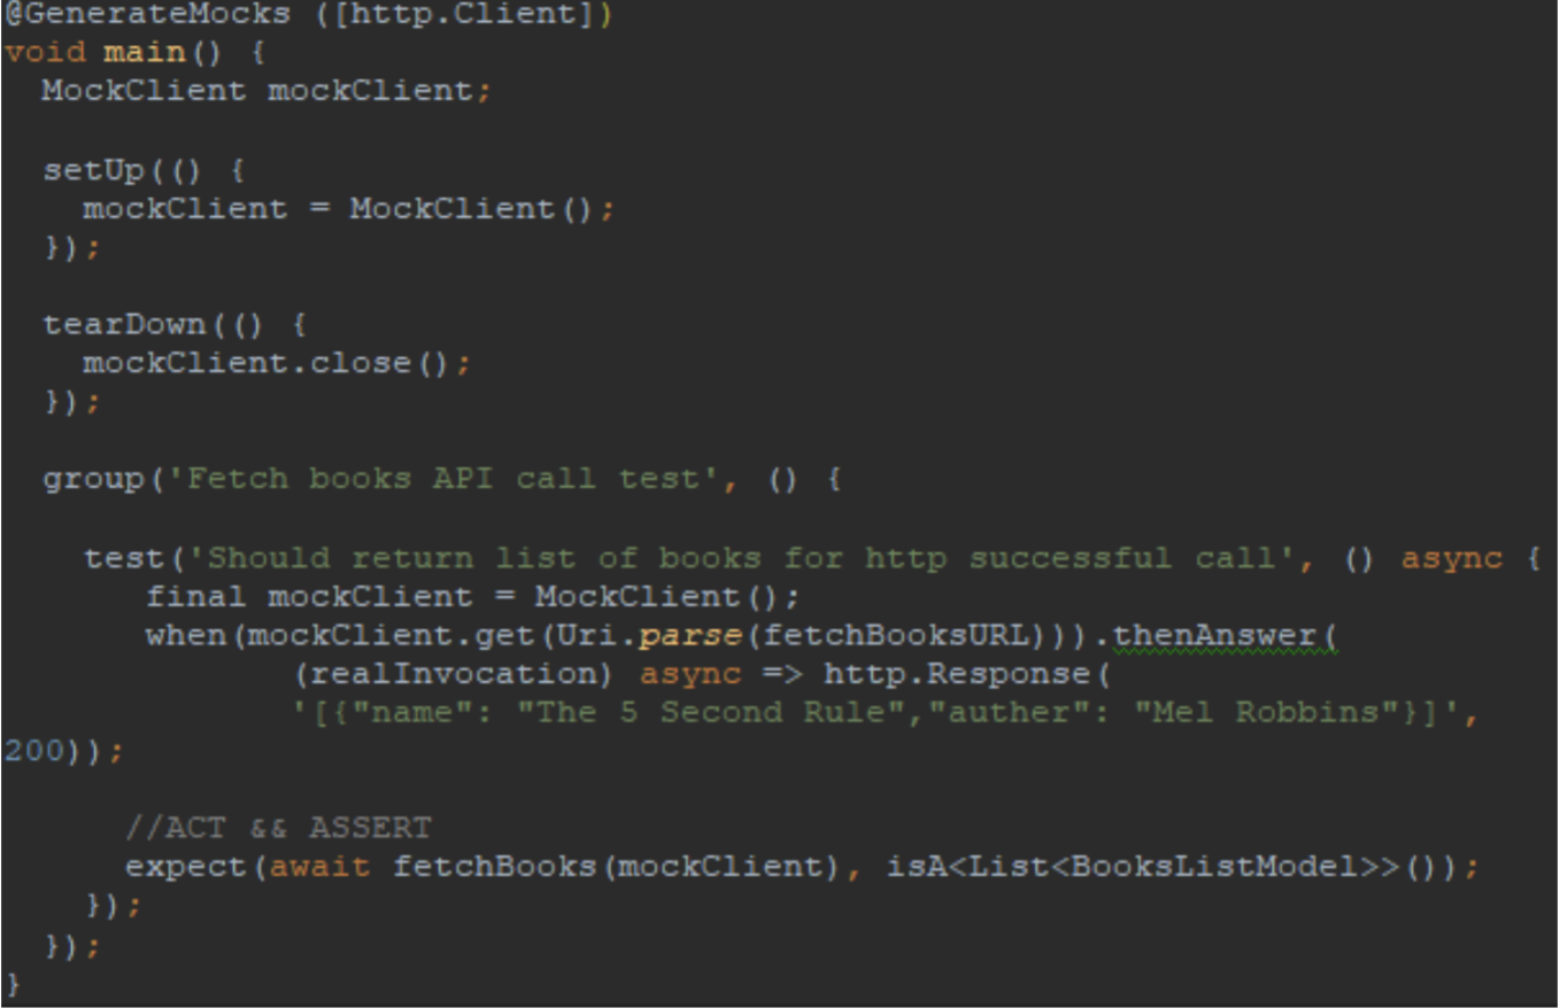
Using @GenerateMocks([http.Client]), mockito understands the HTTP client needs to be mocked for the test class.
After creating a Mock Client, we must inject the mockClient into the fetchBooks(mockClient) method. We can then initialize Mock Client in the setUp() method, which will be used in test cases repeatedly. Anything we would like to do before the test can be specified in setUp().
We can use tearDown() method to close the mockClient once all test cases are executed. Anything we decide to do after the test, can be specified in the tearDown() method.
For more details on API integration testing, refer here.
Example of an integration test on the UI level
Suppose we want to test the interaction between Login and Home screen for the HRMS app for testing the scenario 'if username and password are correct, the user is navigated to Home Screen' then the code looks like below:
Sample integration_test:

We use 'IntegrationTestWidgetsFlutterBinding', which ensures the integration flow among all the components in the group in the test class.
Example of an integration test on the database level
- sqflite - to access and manipulate SQLite database
- firebase_database - to access and manipulate NoSQL databases from Google

End-to-end testing
E2E testing (also called system testing) evaluates the functionality of an entire system or application from start to finish. The goal of end-to-end testing is to ensure that all components of the system are working together as intended and that the application performs as expected under various real world scenarios.
The entire system is tested during an end-to-end test, including its integration with external systems and data sources. This type of testing is usually performed after unit testing and integration testing have been completed. The end-to-end test is the final step in the testing process before the software is released to users.
Flutter Framework
E2E testing can be implemented in the same way as explained in the UI integration testing section for Login flow.
Selenium and Appium
You can use Selenium WebDriver for Flutter web testing, and Appium for Flutter iOS and Android testing. Refer here.
testRigor
testRigor is most effective in performing E2E testing for Flutter mobile apps. There's no programming language dependency since testRigor is a codeless AI-driven tool - which means that even manual QA testers can comfortably own the process of creating, editing, and maintaining any test cases. The speed of test creation is up to 15x faster compared to Selenium or Appium, and the test maintenance issue is basically obliterated.
- Shared suite can be used to perform parallel testing of the app on both iOS and Android platforms.
- Any UI change in the app can be easily tested since it supports visual testing with tools like Applitools.
- API tests can also be performed using testRigor. Refer here.
- Can be easily integrated with tools like JIRA, TestRail, most CI/CD tools, etc.
- Extremely easy to implement and use.
- Maintenance is up to 95% less compared to other e2e tools.
- Uses plain English language for creating test cases.
- Test execution speed is highly optimized.
Below is the test implementation for 'Login and verify an employee's timesheet for September by employee ID' for the HRMS app.
enter “mgeethan@gmail.com” into “Username”
enter “password” into “Password”
click on “Login”
check that page contains “Welcome to HRMS”
click on “Timesheet”
check that page contains “Employee Details”
check that table “Employee Details” at row “2” and column “Action” contains link “12451”
click on “12451”
check that page contains “Month: September Total hours worked: 160”
testRigor provides a very effective way of interacting with forms and tables. You can refer to cells in a table with the intersection of rows and columns.
Conclusion
The article above provides an overview of the types of technologies and tools that can be used to create a robust and efficient testing framework. Implementing such a framework can help maximize ROI, ensure high-quality deliverables, and provide the best possible user experience for customers.