How to Build Selenium Tests
|
|
Introduction
Selenium is one of the most used tools in the testing community when it comes to cross-browser testing. It provides ability to test across multiple browsers and operating systems, and supports multiple programming languages to build tests.
Browsers: Chrome, Internet Explorer, Safari, Opera, Firefox, Edge
Operating Systems: Windows, MacOS, Linux
Programming Languages: C#, Java, JavaScript, Ruby, Python, PHP, Perl
Selenium is a widely used test automation tool among QA professionals due to its support for a variety of technologies. It is one of the oldest and most popular tools in software testing, and in this article we will cover writing tests with Selenium as well as touch bases on some of its limitations.
What is Selenium WebDriver and how does it work?
Selenium WebDriver is an open-source collection of APIs that is used for testing web applications. The Selenium WebDriver tool is used for automating web application testing and performing tasks such as clicking buttons, filling out forms, and navigating between pages. WebDriver is a combination of APIs and interfaces. WebDriver API contains user-defined packages, classes, and methods, that are packaged into jar files. These jar files are configured in the test automation projects so that browser automation can be enabled. The WebDriver communicates with a web browser through a driver, which is a small program that acts as a bridge between the WebDriver and the browser. The driver understands the commands sent by the WebDriver and translates them into actions that the browser can understand and execute.
Let’s take a look at the WebDriver interface, which contains purely abstract methods without any method body sample like the one below:
Interface WebDriver {
  m1(){}
  m2(){}
  m3(){}
}
And there are a set of classes implemented such as:
class FirefoxDriver implements WebDriver {}

class InternetExplorerDriver implements WebDriver {}

class ChromeDriver implements WebDriver {}
These classes are implementing the WebDriver interface for method definition and implementation.
To understand how Selenium WebDriver works, we will take an example with implementation. Before that, let’s discuss the advantages of Selenium and why it is widely used.
Advantages of Selenium
- Open-source and free to use.
- Has a large and active community of users, making it easy to find support and resources.
- Can be integrated with other tools such as TestNG, JUnit, and Maven for test management and reporting.
- Provides APIs for several programming languages that enable developers to write test cases using their preferred language.
- Can be configured with CI/CD tools such as Jenkins, TeamCity, etc.
- Supports regular and headless modes.
- As discussed above, it supports cross-browser, cross- platform, and multiple programming languages for automating web applications.
- Supports parallel test execution.
- Uses fewer hardware resources compared to some other tools in the market such as UFT, Silk Test, etc.
Steps to build and execute Selenium projects with Cucumber framework using Java and Maven
Now let’s deep dive into the technical details and build a Selenium test with an example from the Amazon website:
Tools and technologies used for the example test below:
Tool: Selenium 3.0+
Programming Language: Java 1.8 or higher
Maven: Maven 3.8.5 or higher
Design Pattern: Page Object Model
Framework: Cucumber with BDD
Reporting: Html Reports, Allure
Browser: Google Chrome (Latest Version)
Prerequisites
Before conducting testing, some prerequisites need to be followed:
-
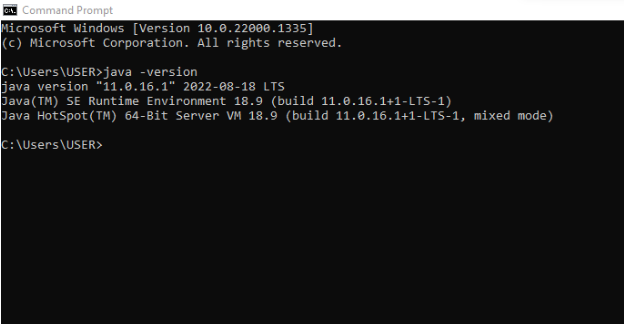
Install Java 1.8 or higher. Refer hereCheck that Java installation is successful. Open the command prompt and type -> java -version
- SInstall IntelliJ IDE, Community Edition. Refer here.
- Install Maven 3.8.5 or higher. Refer here.
-
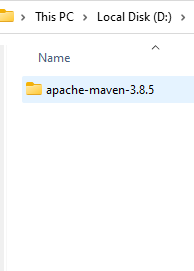
Set up Maven in system environment variables as below:
-
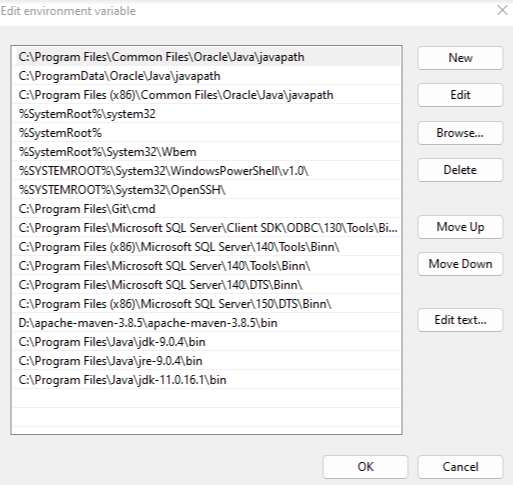
Set up Maven in System Environment variables as below:

-
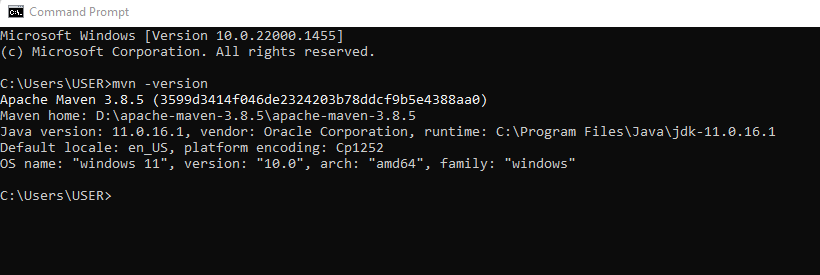
Check that Maven installation is successful. Open the command prompt and type ->mvn -version
-
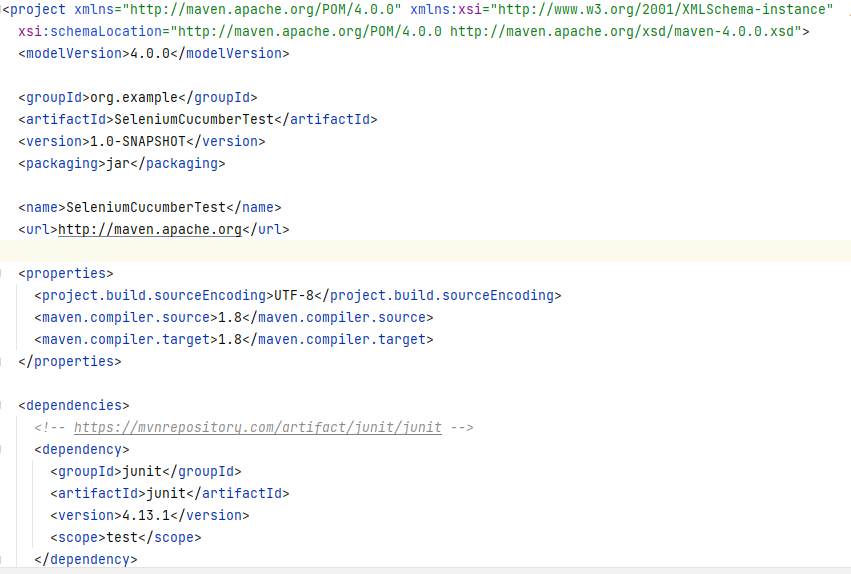
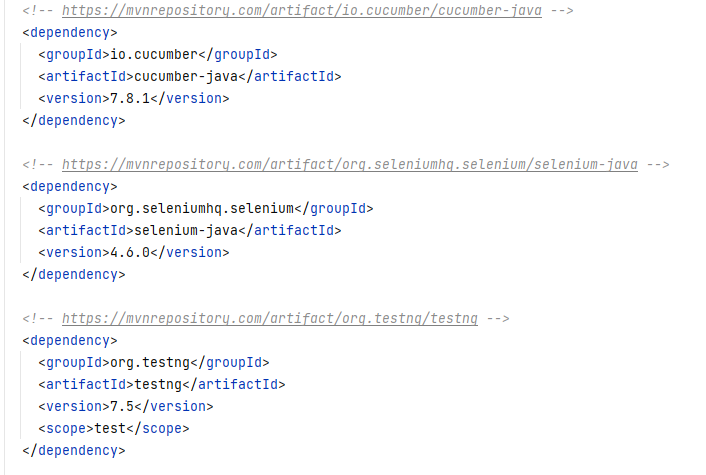
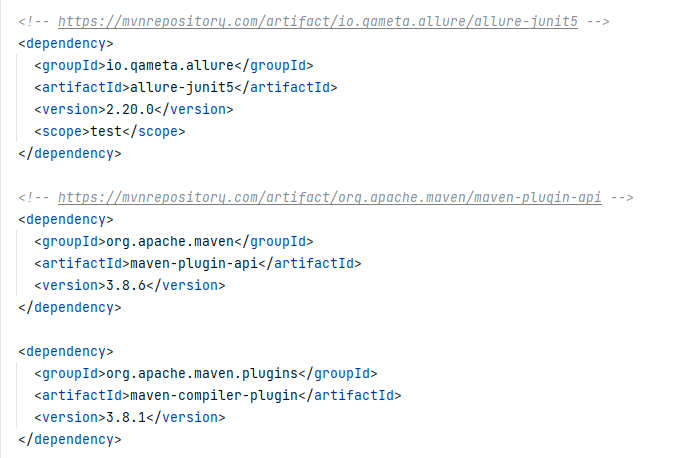
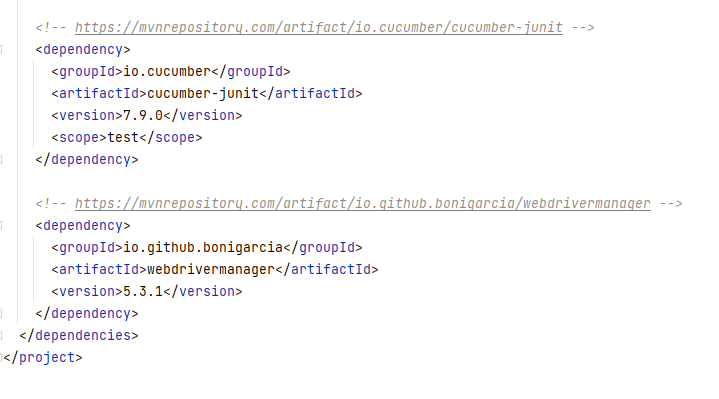
Once Maven is installed, we need to configure pom.xml with all the relevant dependencies to start building Selenium tests. To understand pom.xml better, refer here.
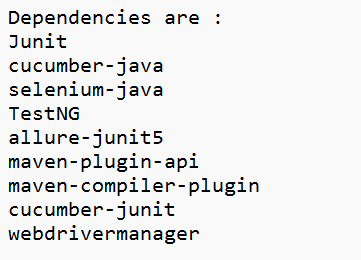
-
Sample pom.xml should be as below:
-
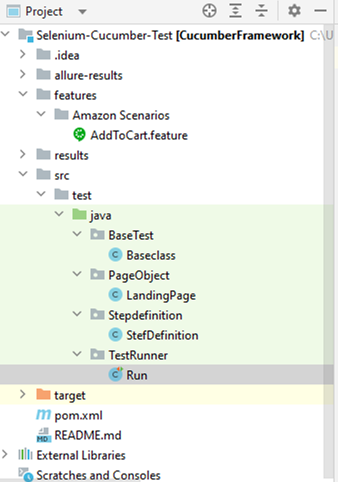
Once all the above setup is done, the project structure should look as below:
Since we are using Cucumber with Selenium WebDriver, it is important to understand Cucumber and it’s components.
Cucumber is a testing tool that supports Behavior Driven Development (BDD). It offers a way to write tests that anybody can understand, regardless of their technical knowledge. Cucumber uses plain-text Gherkin language that allows you to describe the behavior of the test case and expected outcomes with “Given”, “When”, “Then” keywords. This format takes time to get used to, but the benefit is that even lesser technical people are able to define test scenarios with it.
- Feature file
- Step Definition
- Test Runner
Let’s look into the implementation in the below example. For more details on Cucumber, refer here.
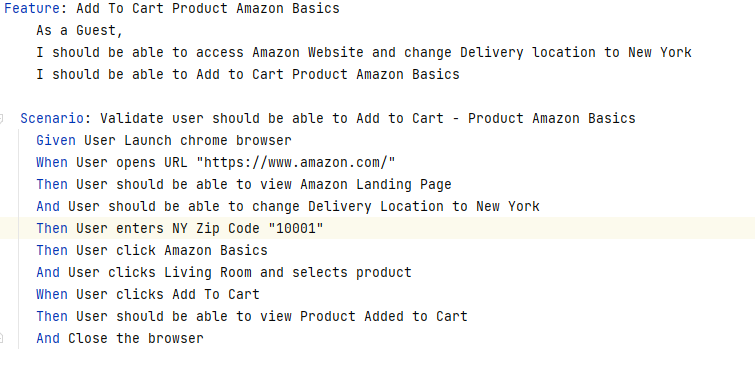
Sample Selenium test for the below use case (UC_Amazon_Add_to_Cart)
As a Guest,
I should be able to access Amazon Website and change the delivery location to New York
I should be able to Add to Cart a product from Amazon Basics
The sample feature file looks like this:
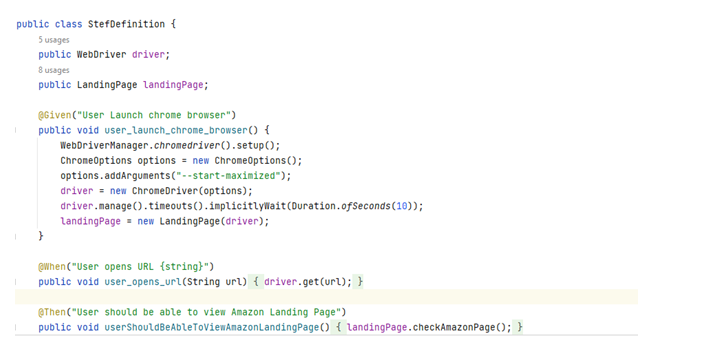
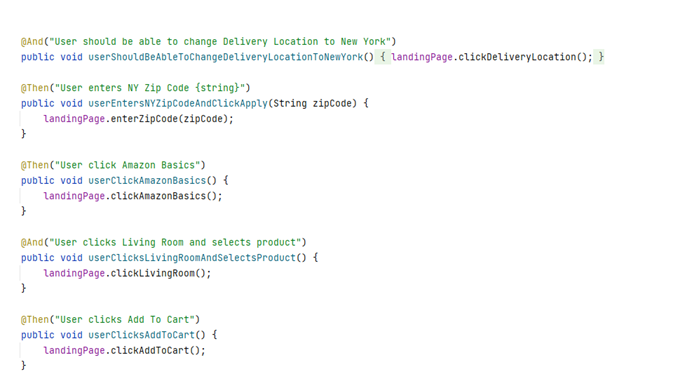
Sample Step Definiti on file looks like this:

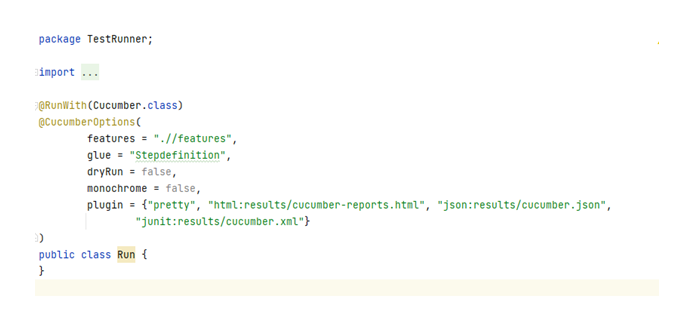
Sample Test Runner file looks like this:
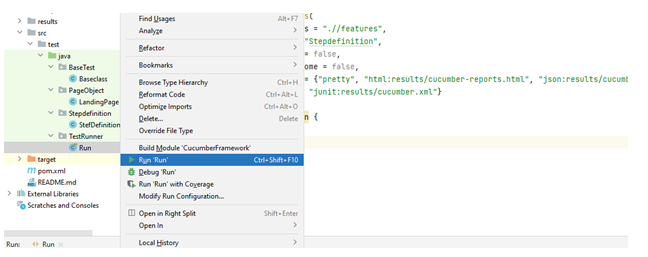
The test should be executed as below:
Sample test results look like this:

Limitations
- As seen in the section above, there are quite a number of prerequisite steps that need to be followed before a Selenium test can be set up and executed.
- There is a long list of dependencies that needs to be configured to use Selenium to its full potential.
- Selenium needs a programming language and hence can be complex and cumbersome to implement looking at the number of configurations needed.
- Failure analysis and debugging are not straightforward and can take a lot of effort and time.
- Maintenance is an issue since whenever there is any change in UI the corresponding code fixes need to be done.
- There is no customer support available due to being open-source
- A separate configuration is needed for build management and another separate one for CI/CD.
- There is no support for native mobile or native desktop applications.
- As we can see from the example above, it is a heavy framework and may be difficult to keep up from the scalability point of view.
- Selenium doesn’t have built-in reporting and needs external dependencies to configure it.
- There is no support for API testing, Soap or Rest platforms.
- Selenium requires a lot of maintenance for existing tests, which slows down the process. Many companies are not able to get past 35-40% test coverage.
-
Test management tools can be integrated with a plug-in; there is no built-in feature to integrate tools such as JIRA, Test Rail, etc.
Effective ways to overcome Selenium limitations
We have covered the pros, implementations, and cons of Selenium as a test automation tool. Now let’s discuss how these limitations can be easily addressed. How about using a tool for your test automation that is efficient and already has all the features such as CI/CD, robust reporting, support for desktop and API testing, visual testing, and seamless end-to-end test suite implementation capabilities? testRigor is such a tool, where you write tests in plain English, get ultra-stable results, and spend minimal time on maintenance.
What is testRigor?
testRigor is a codeless testing tool that enables anyone to create efficient end-to-end functional and non-functional tests. You can create cross-platform tests for web, native and hybrid mobile applications, native desktop applications, and API. You can expand test coverage much faster, while also spending very little time on maintenance (up to 95% than with Selenium, measured with our customers). It supports BDD out of the box, and is more effective to use for BDD than Cucumber, Specflow, or any similar tool (we’ve covered this topic in another blog).
testRigor with example
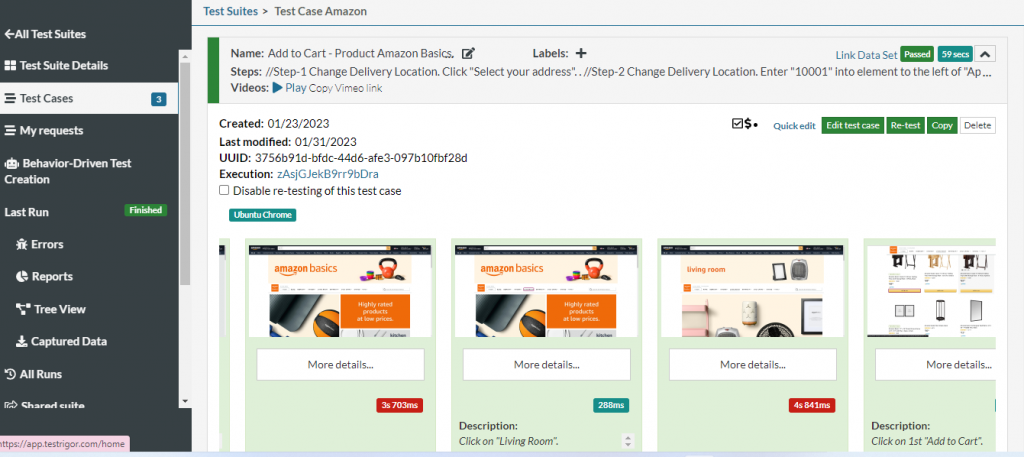
Let’s take the example of the same use case (UC_Amazon_Add_to_Cart) and compare how easy the building of a test in testRigor is.
// Step-1 Change Delivery Location
click “Select your address"

// Step-2 Change Delivery Location
enter “10001" into element to the left of “Apply"

// Step-3 Change Delivery Location
click “Apply"
click “Done"

// Step-4 click Amazon Basics
click on “Amazon Basics"

// Step-5 click Living Room
click on “Living Room"

// Step-6 click Add to Cart
click on “Add to Cart"

// Step-7 check product added to cart
check that page contains “Added to Cart"
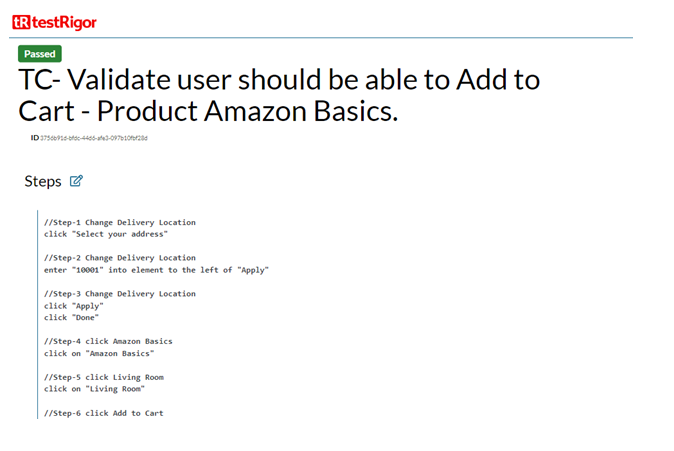
As you can see below, there are detailed screenshots automatically generated for each test step, which are expandable – making it very simple to debug.
Advantages
- Implementation of scripts is very straightforward, requiring only the writing of manual test steps in plain English.
- Test steps are written in the way the user performs the action on an application under test, and the AI behind the tool intelligently and efficiently performs the operations specified in the test steps.
- The ease of tool adaptation and the ease of maintenance is very high.
- Every stakeholder can collaborate and contribute to writing test cases since no programming skills are needed.
- Supports iOS and Android testing, for both native and hybrid applications. A shared suite can be used to perform parallel testing of the app on both platforms.
- Fast and effective customer support for all paid tiers.
- Good documentation support and guidelines.
- Supports visual testing, and also has an integration with Applitools.
- Test results are self-explanatory capturing screenshots for every test step execution.
- testRigor supports integrations with most CI/CD tools.
- Test data can be managed effectively using a built-in feature.
- Allows usage of reusable rules to build an optimized and non-redundant test suite.
- Easy to analyze, understand and debug test failures.
- Helps in building a robust and stable end-to-end test suite.
- Can be easily integrated with tools like JIRA, TestRail, etc.
- Supports cross-browser and cross-platform testing


