NOCODB Testing
|
|

NocoDB provides an intuitive spreadsheet interface for creating online databases, either from scratch or by connecting to any Postgres/MySQL. With strong open source ethos – NocoDB caters to businesses of all sizes & shapes . Be it Agencies, Startups, Small Medium Businesses and Enterprises.
An ideal way to test the application will be using testRigor end-to-end testing.
E2E for NocoDB
NocoDB turns any SQL database into a spreadsheet-like app. Because it’s a rich, client-heavy UI backed by APIs and a DB, the highest risk sits in cross-layer workflows: onboarding (first-run setup), base/project creation, table/column operations, permissions, and CRUD via the UI. End-to-end (E2E) tests validate those flows from a real user’s perspective.
testRigor
- Readable tests your team (and NocoDB contributors) can review.
- Resilient element targeting by visible text, labels, and relative anchors.
- Zero local browser infra; run locally or inside CI (we tunnel localhost for PR checks).
- Artifacts (video, screenshots, JUnit) for fast triage.
Setting up test suite
With a NocoDB account created and with access to the application, now we can create a test suite to start performing end to end test cases, following the following steps:
Step 1: Log in to your testRigor app with your credentials.
- Test Suite Name: Provide a relevant and self-explanatory name.
- Type of testing: Select from the following options: Desktop Web Testing, Mobile Web Testing, Native and Hybrid Mobile, based on your test requirements.
- URL to run test on: Provide the application URL that you want to test.
- Testing credentials for your web/mobile app to test functionality which requires user to login: You can provide the app’s user login credentials here and need not write them separately in the test steps then. The login functionality will be taken care of automatically using the keyword login.
- OS and Browser: Choose the OS Browser combination on which you want to run the test cases.
-
Number of test cases to generate using AI: If you wish, you can choose to generate test cases based on the App Description text, which works on generative AI.
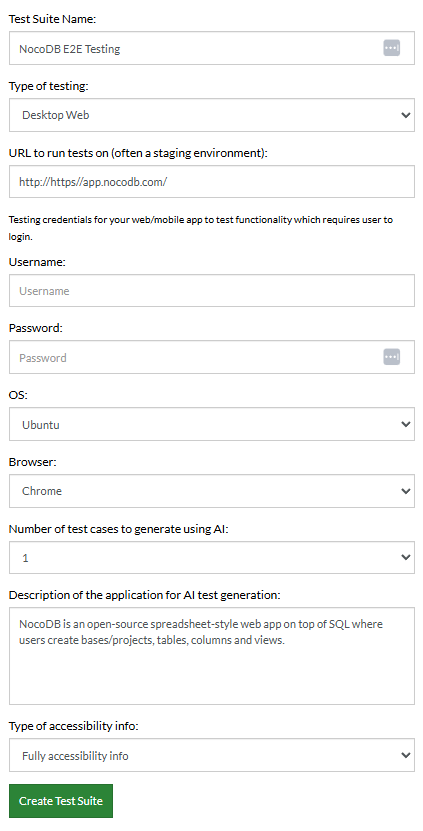
Step 3: Click Create Test Suite.
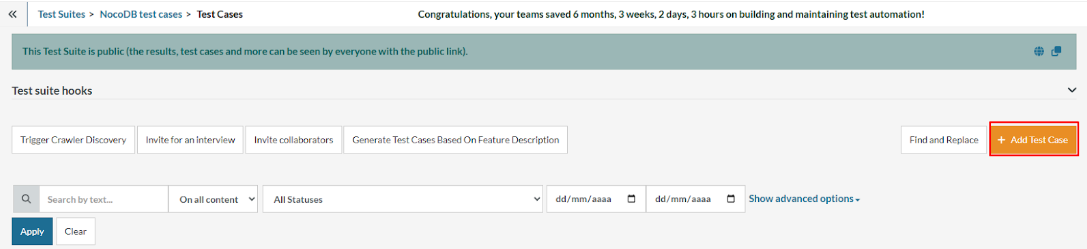
On the next screen, you can let AI generate the test case based on the App Description you provided during the Test Suite creation. However, for now, select do not generate any test, since we will write the test steps ourselves.
Step 4: To create a new custom test case yourself, click Add Custom Test Case.
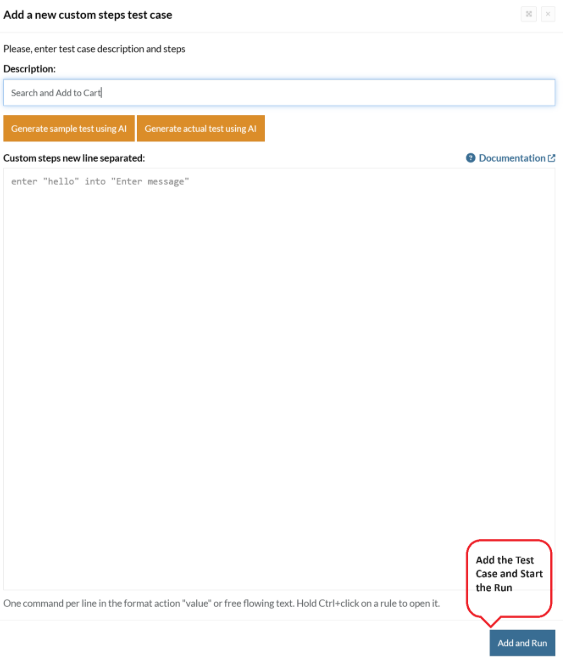
Step 5: Provide the test case Description and start adding the test steps.
For the NocoDB application under test, we will perform below test steps:
- Login to the application;
- Create a table;
- Add a new record.
Test Case: Creating new table and records
Step 1: We will add test steps on the test case editor screen one by one.
testRigor automatically navigates to the website URL you provided during the Test Suite creation. There is no need to use any separate function for it. Here is the website homepage, which we intend to test.
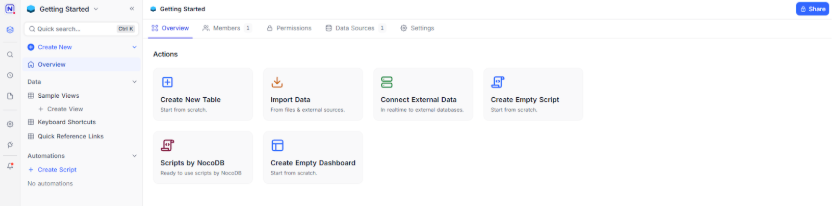
To have access to the main page, we need to login to our account. For that, testRigor has a built-in reusable rule “login”, that will use the variables “Username” and “Password” defined in the test suite creation to perform the login function.
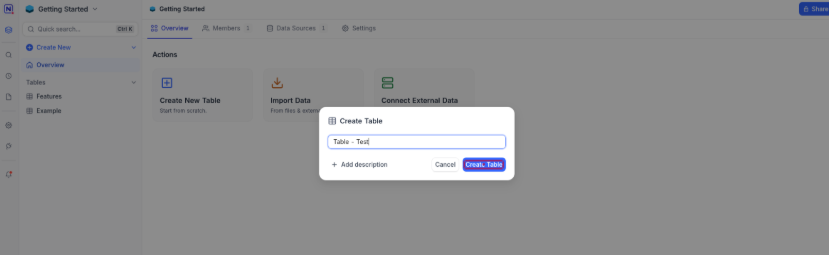
click "Create new"
click "table"
type "Table - Test"
click "create table"
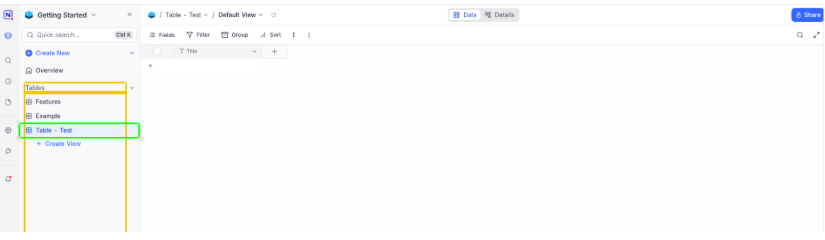
Step 3: We can validate that the table was created with a simple step, and it will be shown in the screenshot.
type "test 1"
type enter
type "test 2"
type enter
type "test 3"

Complete Test Case
Here is how the complete test case will look in the testRigor app. The test steps are simple in plain English, enabling everyone in your team to write and execute them.
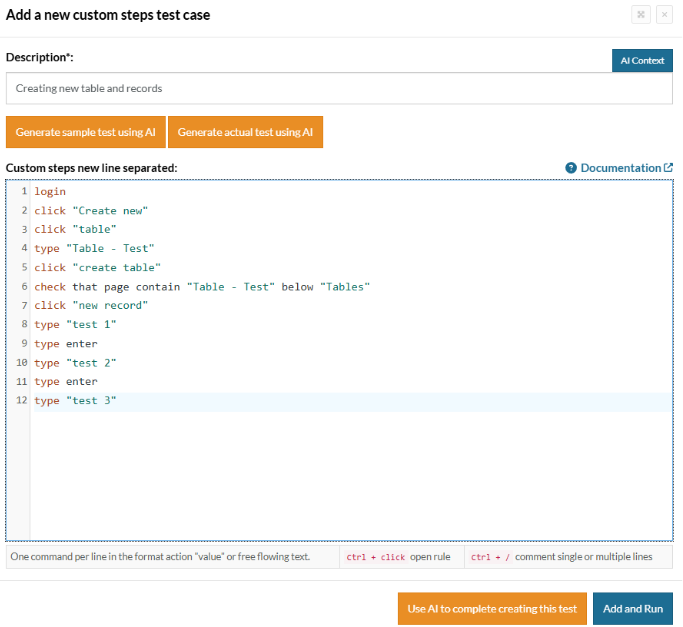
Click Add and Run.
We can also add a final step “RR: Delete test Table”, wich will delete the table in the end of a test case in order to avoid errors in future suite re-runs.
Full Suite’s Test Cases
This section will present an example of a few tests that may comprise a NocoDB’s test suite.
Prerequisites
For the test suite run properly, there are a few steps we must take before running the test cases, wich are the Before Test Suite Hook and the Reusable Rules.
Test Suite Hooks
enter stored value "username" into "e-mail"
enter stored value "password" into "password"
click "sign up"
click "work"
click "individual contributor"
click "engineering"
click "51-250"
click "1-10"
click "advanced"
click "openAI"
click "finish"
click "create new"
click "table"
type "Example"
click "create table" on the right of "cancel"
click "Example"
click "fields"
click "new field"
click "Number" below "long text"
type "NumberEx"
click "save field"
click "new field"
click "Checkbox" below "Attachment"
type "True"
click "save field"
click "new field"
click "single select" below "multi select"
type "select"
click "save field"
Reusable Rules
hover over "Table - Test"
click first button on the right of "Table - Test" with offset "-1, 8"
click "delete table"
click "delete table" on the right of "cancel"
check that page does not contain "Table - Test"
Now, we can proceed with the test cases:
Testing different field types
login
click "create new"
click "table"
type "Table - Test"
click "create table"
click "details"
click "new field"
type "Number"
click "Single Line Text"
click "Number"
click "new field"
type "CheckboxEx"
click "Single Line Text"
type "Checkbox"
type enter
click "new field"
type "DateEx"
click "Single Line Text"
type "Date"
type enter
click "save changes"
click "Data"
click "new record"
type "Example Title"
type tab
type "NaN"
check that page does not contain exactly "NaN"
type "100"
type tab
type enter
type tab
type enter
click "Today"
check that page contains stored value "nowDateIso"
RR: Delete test table
Creating custom filters
login
click "Example" below "overview"
click "Filter"
click "Add Filter"
click "Title" on the left of "is equal"
click "True" Below "NumberEx"
type esc
check that page does not contain "Four"
check that page does not contain "Seven"
click "Filter"
click "Add Filter"
enter "Ten" on input on the right of "is equal"
type esc
check that page does not contain "Nine"
check that page contains "2" on the right of "filter"
click "Filter"
click first button on the right of "is check"
click first button on the right of "is equal"
type esc
check that page does not contain exactly "2" on the right of "filter"
Testing group options
login
click "Example"
click "Group" on the right of "filter"
click "True" below "NumberEx"
type esc
check that page contains exactly "1" on the right of "Group"
click "Group" on the right of "filter"
click first button on the right of "true"
click "NumberEx"
type esc
check that page contains exactly "1" on the right of "Group"
click "Group" on the right of "filter"
click second button on the right of "NumberEx"
type esc
check that page does not contain exactly "1" on the right of "Group"
Testing sort options
login
click "Example"
click "Sort" on the right of "Group"
click "Title" above "NumberEx"
type esc
click "Sort" on the right of "Group"
click third button on the right of "Title"
click "NumberEx"
type esc
click "Sort" on the right of "Group"
click third button on the right of "NumberEx"
type esc
check that page does not contain exactly "1" on the right of "Group"
New form view for an existing table
login
click "example"
click "create view" below "Example"
click "Form" below "Grid"
click "create view" on the right of "cancel"
click "Add form description"
type "This is an example description"
enter "Title 1" into first input roughly below "Title"
enter "123" into first input roughly below "NumberEx"
click "submit" on the right of "clear form"
check that page contains "This is an example description"
check that page contains "Successfully submitted form data"
hover over "Form"
click second button on the right of "Form"
click "delete form"
click "delete view" on the right of "cancel"
check that page does not contain exactly "Form" below "Example"
New gallery view form for an existing table
login
click "example"
click "create view" below "Example"
click "Gallery" below "Grid"
click "create view" on the right of "cancel"
click "123"
check that page contains "123"
click "comment..."
type "Test X"
type enter
type esc
type esc
hover over "Gallery"
click second button on the right of "Gallery"
click "delete"
click "delete view" on the right of "cancel"
check that page does not contain "Gallery" below "Example"
New calendar view from an existing table
login
click "example"
click "create view" below "Example"
click "Calendar" below "Grid"
click "create view" on the right of "cancel"
click "day"
check that page contains "records In this day"
click "week"
check that page contains "records In selected week"
click "month"
check that page contains "records In this month"
click "year"
check that page contains "records In this year"
hover over "calendar"
click second button on the right of "Calendar"
click "delete"
click "delete view" on the right of "cancel"
check that page does not contain "Calendar" below "Example"
New kanban view from an existing table
login
click "example"
click "create view" below "Example"
click "Kanban" below "Grid"
click "create view" on the right of "cancel"
click "New stack"
type "Option 1"
type enter
check that page contains "0/0 records"
drag "123" to "option 1"
check that page contains "1/1 record"
click first button on the right of "option 1"
click "delete stack"
click "delete stack" on the right of "cancel"
hover over "Kanban"
click second button on the right of "Kanban"
click "delete"
click "delete view" on the right of "cancel"
check that page does not contain "Kanban" below "Example"
Testing user profile settings
login
click 2nd button on the left of "getting started" and roughly below "example"
click "profile"
enter "Example" into first input roughly below "name"
click "save"
click "User Management"
check that page contains "Example"
click "profile"
enter "NocoDB" into first input roughly below "name"
click "save"
click "User Management"
check that page contains "NocoDB"
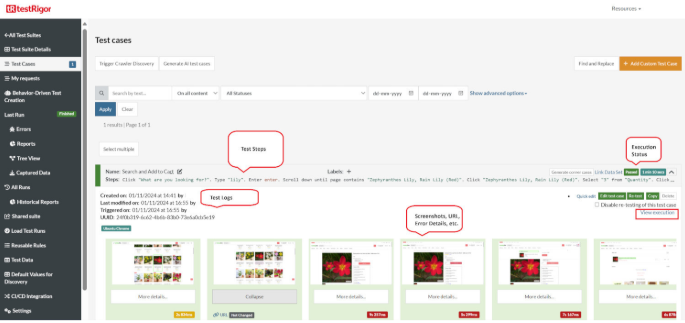
Execution Results
Once the test is executed, you can view the execution details, such as execution status, time spent in execution, screenshots, error messages, logs, video recordings of the test execution, etc. In case of any failure, there are logs and error text that are available easily in a few clicks.
You can also download the complete execution with steps and screenshots in PDF or Word format through the View Execution option.
testRigor’s Capabilities
- Reusable Rules (Subroutines): You can easily create functions for the test steps that you use repeatedly. You can use the Reusable Rules to create such functions and call them in test cases by simply writing their names. See the example of Reusable Rules.
- Global Variables and Data Sets: You can import data from external files or create your own global variables and data sets in testRigor to use them in data-driven testing.
- 2FA, QR Code, and Captcha Resolution: testRigor easily manages the 2FA, QR Code, and Captcha resolution through its simple English commands.
- Email, Phone Call, and SMS Testing: Use simple English commands to test the email, phone calls, and SMS. These commands are useful for validating 2FA scenarios, with OTPs and authentication codes being sent to email, phone calls, or via phone text.
- File Upload/ Download Testing: Execute the test steps involving file download or file upload without the requirement of any third-party software. You can also validate the contents of the files using testRigor’s simple English commands.
- Database Testing: Execute database queries and validate the results fetched.
testRigor enables you to test web, mobile (hybrid, native), API, and desktop apps with minimum effort and maintenance.
Additional Resources
- Access testRigor documentation to know about more useful capabilities
- Top testRigor’s features
- How to perform end-to-end testing
Setting up GitHub CI/CD Integration
For automated testing in your GitHub repository, you’ll need to configure your testRigor credentials as GitHub secrets. This approach differs from local testing by using GitHub’s secure environment variables instead of a local .env file.
Step 1 – Add GitHub Secrets
- Go to your GitHub repository
- Click on “Settings” → “Secrets and variables” → “Actions”
- Add the following:
- As a secret:
- NOCODB_AUTH_TOKEN: Your testRigor auth token (keep this private)
- As variables:
- NOCODB_TEST_SUITE_ID: Your testRigor Test Suite ID
- NOCODB_BASE_URL: Your NocoDB website URL
- As a secret:
For further information on creating secrets and variables in GitHub Actions, you can check the official GitHub documentation on secrets and variables.
Required GitHub Secrets and Variables:
- NOCODB_TEST_SUITE_ID: Your testRigor Test Suite ID (e.g., 12345)
- NOCODB_AUTH_TOKEN: Your testRigor auth token (format: ########-####-####-####-############)
- NOCODB_BASE_URL: Your NocoDB website URL (e.g., <a href=”https://yourstore.com”>https://yourstore.com</a>)
Step 2- Use in GitHub Actions
- name: Run testRigor Tests

  run: bin/mftf run:testrigor

  env:

    NOCODB_AUTH_TOKEN: ${{ secrets. NOCODB_AUTH_TOKEN }}

    NOCODB_TEST_SUITE_ID: ${{ vars. NOCODB_TEST_SUITE_ID }}

    NOCODB_BASE_URL: ${{ vars. NOCODB_BASE_URL }}
Key Difference: While local testing uses a .env file, CI/CD uses GitHub’s secure secret management system, ensuring your credentials are encrypted and only accessible to authorized workflows.
Troubleshooting Tips
- Make sure your NocoDB site is running and accessible at the URL you specified
- Check your .env file – ensure all three values are correct and there are no extra spaces
- Verify your testRigor account – make sure you can log in and see the test suite
- Check your internet connection – testRigor needs to download some tools on first run
If you need to start over, simply delete the .mftf-tools folder and run the command again.
Conclusion
With NocoDB, you can turn any SQL database into a spreadsheet-style app and move from setup to usable data fast. To keep those experiences reliable at scale, pair it with end-to-end automation: testRigor lets you write resilient, plain-English tests and run them in CI with clear artifacts. Before adopting, assess your flows and coverage needs, then choose the configuration that best fits your team and environments.
| Achieve More Than 90% Test Automation | |
| Step by Step Walkthroughs and Help | |
| 14 Day Free Trial, Cancel Anytime |