
Coolify Testing: How to Test Your Deployment Workflows with testRigor
 |
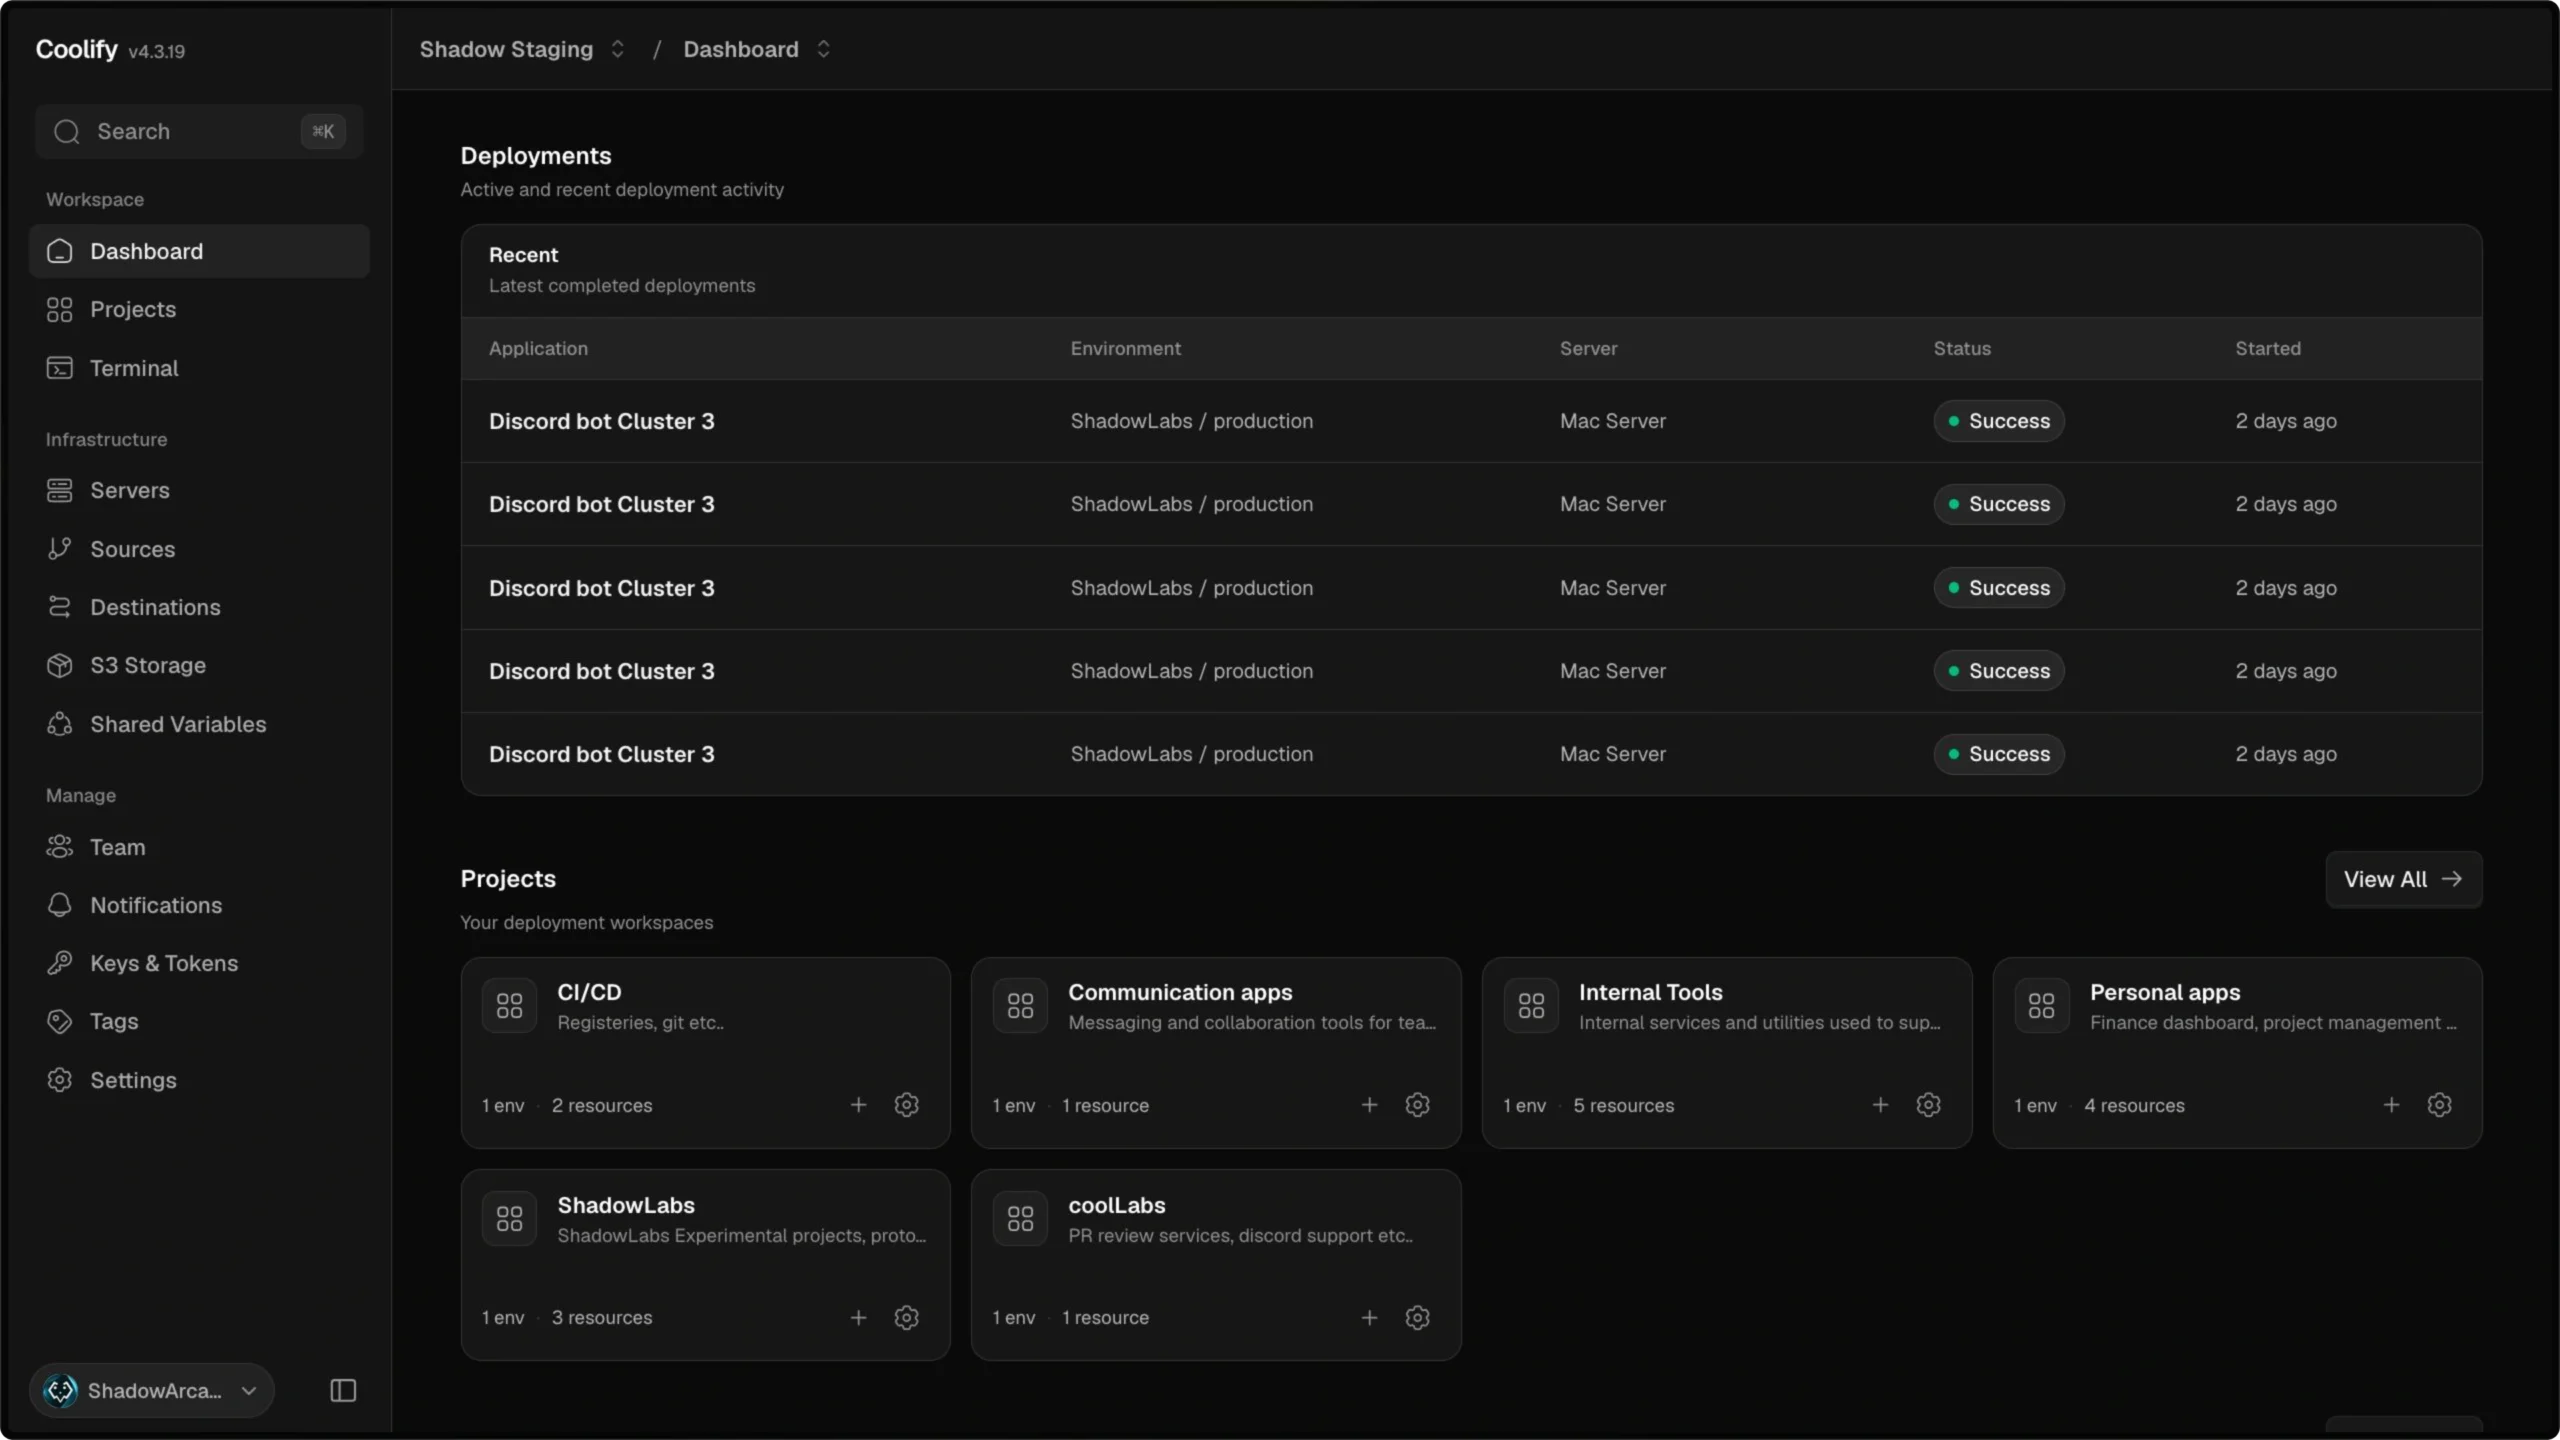
Coolify is an open-source, self-hostable platform for deploying and managing applications, databases, and services on your own servers. It brings deployment settings, projects, environments, server connections, credentials, and team access into one dashboard. Coolify testing helps verify that these workflows behave as administrators expect.
That convenience also makes the dashboard an important part of your infrastructure. An application may appear to have deployed successfully while its URL is unreachable. A project change may not persist, or a team member may have access they should not. For anyone managing self-hosted services, that means checking that the platform still performs these tasks the way a real operator expects.
A useful testing strategy combines smaller code-level checks with end-to-end tests that follow the actual administration and deployment experience. This guide explains what to cover, how to create Coolify tests with testRigor, and what a verified 12-case regression suite demonstrates, including the difference between a completed deployment and a publicly reachable application.
What Should Coolify Testing Cover?
Start with the operations that would interrupt deployments, create security risks, or make infrastructure difficult to manage if they stopped working:
- Authentication and access: successful sign-in, rejected credentials, logout, and protection of authenticated pages.
- Projects and environments: creating, renaming, switching, and deleting configuration containers without affecting unrelated resources.
- Credentials and API tokens: managing private keys and revoking tokens that should no longer provide access.
- Teams and shared variables: membership workflows, invitations, and reusable configuration values.
- Deployments: creating an application from an image, configuring its port, completing a deployment, and safely removing the test resource. Verifying access through its public URL is a separate check.
These workflows are related, but they are not interchangeable. A passing login test does not prove that a Docker image can be deployed. Likewise, an application status displayed as running does not, by itself, establish that someone can open the service through the configured proxy.
What Coolify Already Tests, and What It Does Not
The official Coolify repository contains automated tests, including unit and feature tests as well as Pest browser tests. Those browser tests use the Pest Browser Plugin, which runs on Playwright. For example, the repository’s login tests check that the sign-in form appears, that valid credentials work, and that an incorrect password is rejected.
These checks help maintainers catch regressions in the application itself. However, even a browser test that passes in a controlled test database does not necessarily establish that an already configured Coolify instance can reach a server over SSH, pull an image, start a container, and serve its contents through a proxy.
A complementary testRigor suite can exercise those operations from the browser against a running instance. In one Coolify fork implementation, a hosted testRigor suite covers 12 administration and deployment scenarios. Its GitHub Actions execution on November 8, 2026 recorded 12 passed, 0 failed, and 0 skipped tests. This result does not establish that the deployed Nginx application was reachable over HTTP.
Scope matters: the workflow ran against an existing Coolify instance configured in testRigor. It did not install Coolify from the pull request, deploy the changed branch, or validate every feature of the platform. It is evidence for the workflows exercised on that particular instance.
Unit Testing in Coolify
Unit tests check small pieces of application logic independently. In a platform such as Coolify, they help developers validate rules, transformations, and decisions without relying on a working deployment server for every test.
Unit testing is valuable when changing Coolify’s code. For platform operators, however, it offers indirect reassurance: a correct internal function does not guarantee that the corresponding action can be completed in the dashboard.
Integration Testing in Coolify
Integration tests examine the boundaries between components. Coolify coordinates deployments through its control plane, connects to servers over SSH, and uses Docker to run workloads. HTTP applications then depend on the server-side proxy to route requests to their containers.
Useful integration checks include confirming that saved configuration reaches the intended resource, server access succeeds, and deployment operations return appropriate results. These tests narrow down failures, but they do not replace a browser-to-deployed-application journey.
End-to-End Coolify Testing
End-to-end (E2E) testing follows an operation through the same screens a person uses and checks its final outcome. An ideal deployment journey looks like this:
Sign in → create a project → add a Docker image → configure the application → deploy → open its URL → verify the page → remove the test resources.
That final verification matters because a completed deployment task and a reachable website answer different questions. The verified 12-case example covers deploying and deleting an Nginx resource, but it does not confirm the welcome page through a public URL. The HTTP-access check below is a recommended extension, not part of that verified result.
There are several ways to automate this browser journey.
testRigor
testRigor lets teams express web interactions and assertions in readable English. Instead of starting with CSS selectors or browser-driver code, a test can describe actions such as clicking a button, entering a name, or checking that a page contains expected text.
This can be practical for Coolify because operators, developers, and QA engineers can review the same workflow. Tests still need careful data management, permissions, and reliable assertions, but their intent remains visible without reading a programming language.
Selenium
Selenium is an established browser automation framework with support for several programming languages. It suits teams that want direct control over browser interactions and already maintain test code. That control also means the team is responsible for locators, test structure, and much of the automation maintenance.
Playwright
Playwright provides browser automation APIs, assertions, and debugging capabilities for code-driven tests. It is particularly relevant to Coolify because the upstream project already uses Playwright through Pest’s browser-testing plugin. testRigor offers a different authoring style rather than replacing the value of those existing checks.
Coolify Testing with testRigor: How to Perform End-to-End Tests
For this walkthrough, assume you have an accessible Coolify instance and want to verify that an administrator can create and deploy a small web application. The example uses the same nginx:alpine image recommended in Coolify’s first-deployment guide. The article separates the recorded deployment test from an additional, not-yet-verified HTTP reachability check.
Create a Coolify Test Suite
- Sign in to testRigor and create a new test suite.
- Use a recognizable name such as Coolify Deployment Regression and select desktop web testing.
- Enter the URL of your test Coolify instance, not the URL of the application you will eventually deploy.
- Configure a browser and the credentials of a dedicated test account with the necessary project and deployment permissions.
- Create the suite, choose to add a custom test case, and enter the steps for the workflow.
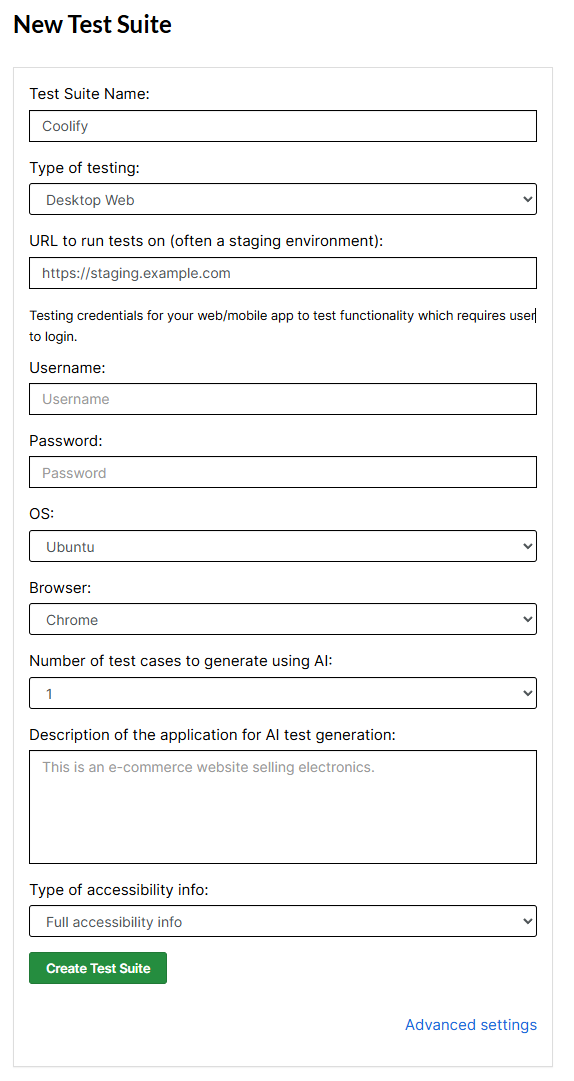
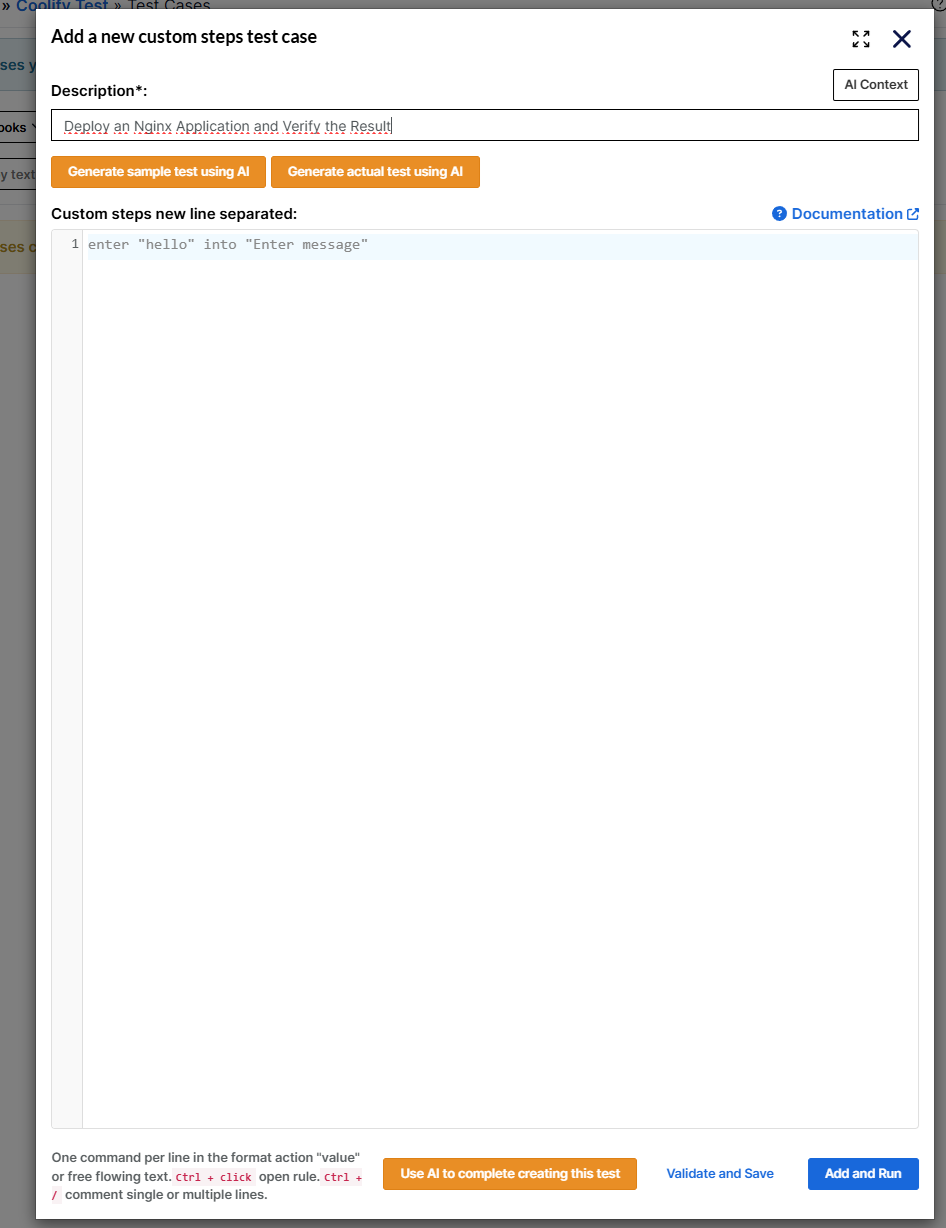
You can begin with a focused smoke test and expand the suite after its data creation and cleanup behavior is reliable.
Set Up a Safe Coolify Testing Environment
Tests that deploy containers, create credentials, or delete resources should run against a dedicated test instance or an isolated environment with the required permissions. Do not run destructive examples against important production workloads.
Before executing the deployment case, confirm that the test environment has a connected server, Docker available, an operational proxy, and enough resources to launch a small container. Coolify’s deployment guide also recommends checking the server and proxy status before the first deployment. Dashboard access alone is not enough to verify a deployed website. If the test will open the application in a browser, confirm that its hostname resolves to an address reachable from the test runner and that the required HTTP/HTTPS ports are accessible. A generated hostname containing a loopback address, such as 127.0.0.1.sslip.io, will not connect a remote runner to the deployment server.
Use a test account with only the access it needs. For team and token tests, create disposable credentials and verify that the test can revoke or remove them. Keep passwords, private keys, and API tokens out of article screenshots and logs.
Test Data for Coolify Testing
Set the Coolify dashboard URL in the testRigor suite’s starting URL field, and configure the dedicated account under the suite’s application-specific credentials. The built-in login command uses those configured credentials, exposed as the special stored values username and password. A separately named Test Data value, such as coolifyUrl, does not automatically change the starting URL. Give temporary projects and other created resources unique names so repeated runs do not collide with earlier ones.
| Value | Purpose | Example |
|---|---|---|
coolifyUrl |
URL of the test instance | https://coolify-staging.example.com |
username |
Special stored value for the configured login account | Set in suite application credentials |
password |
Special stored value for the configured login password | Set in suite application credentials |
projectName |
Temporary project name | Generated for each run |
dockerImage |
Prebuilt image to deploy | nginx:alpine |
applicationPort |
Container’s exposed HTTP port | 80 |
applicationUrl |
Known, reachable application URL for an optional HTTP check | Store explicitly; automatic extraction is not verified |
The example staging hostname is illustrative. Replace it with your instance’s actual URL; do not use it as a working endpoint. The applicationUrl value is separate from the Coolify dashboard URL and should only be used for an optional HTTP check after you have confirmed that the address is reachable.
Test Case: Deploy an Nginx Application and Verify the Result
This walkthrough follows an administrator from project creation through Docker-image deployment and optional website verification. The recorded 12-case regression has a narrower scope: its Nginx case checked deployment logs, running status, and deletion through Coolify. It did not open the generated application URL or assert the Nginx welcome page. Those HTTP checks are proposed additions, not part of the passing regression. The examples below combine steps verified in the capture run with explanatory steps; confirm version-specific labels in your own installation.
Step 1: Sign in
Start at the dashboard URL configured in Test Suite Details and sign in using the application credentials saved for that suite. testRigor’s built-in login command uses these settings; it does not automatically use custom Test Data key names as credentials. If you prefer to write the steps explicitly, use the documented stored values username and password instead.
login
Also maintain a separate negative test for incorrect credentials and a logout test that verifies protected pages cannot be reopened anonymously.
Step 2: Create a Temporary Project
In the Coolify dashboard, open Projects and create a uniquely named project. Coolify’s project interface uses New project, a Name field, and Create project.
click "Projects"
click "New project"
generate from template "coolify-e2e-********" and save as "projectName"
enter stored value "projectName" into "Name"
click "Create project"
check that page contains stored value from "projectName"
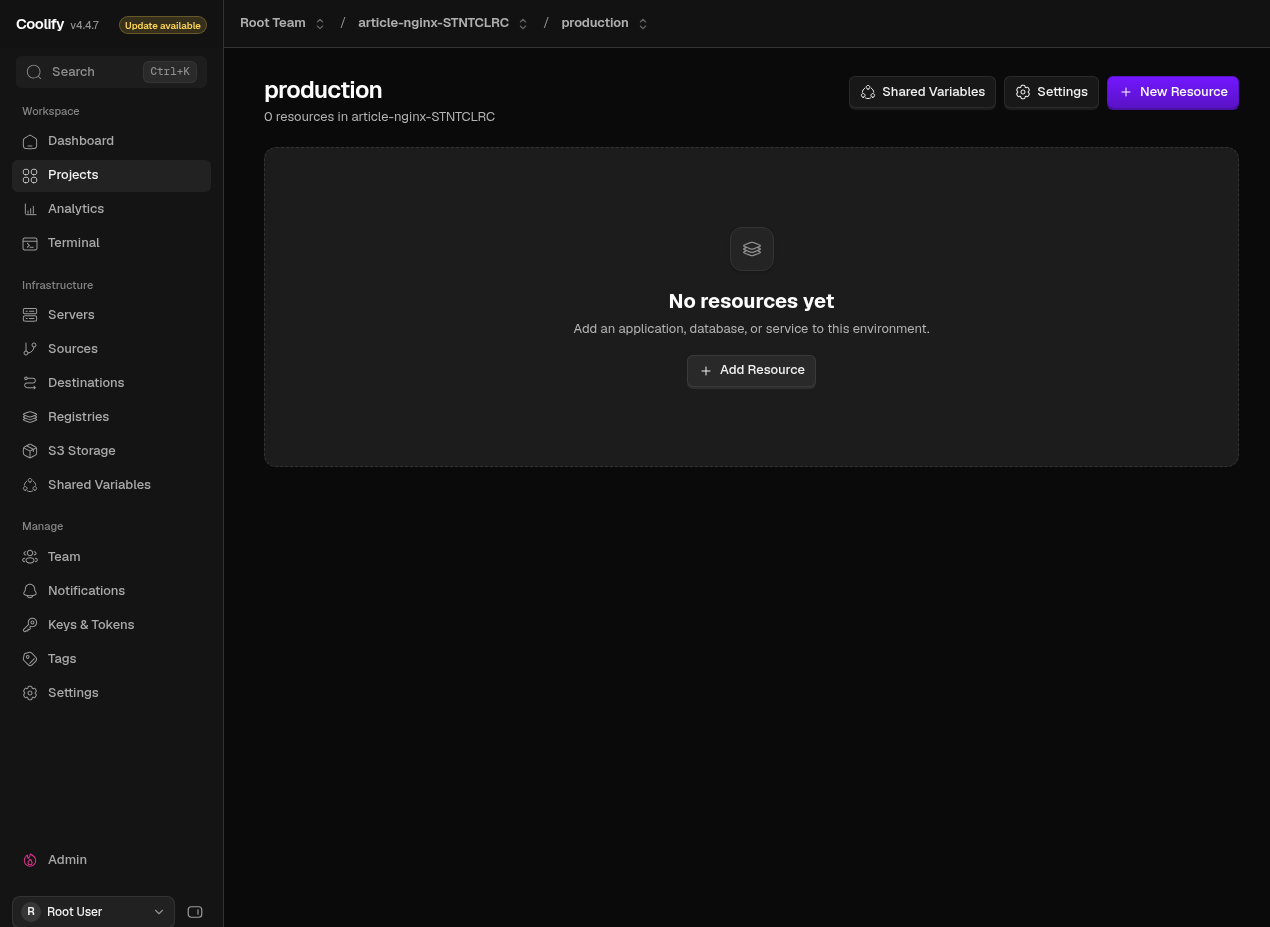
The assertion checks that the new project is visible. If you also need to prove persistence, navigate away, return to Projects, and find the same name again.
Step 3: Create a Docker Image Resource
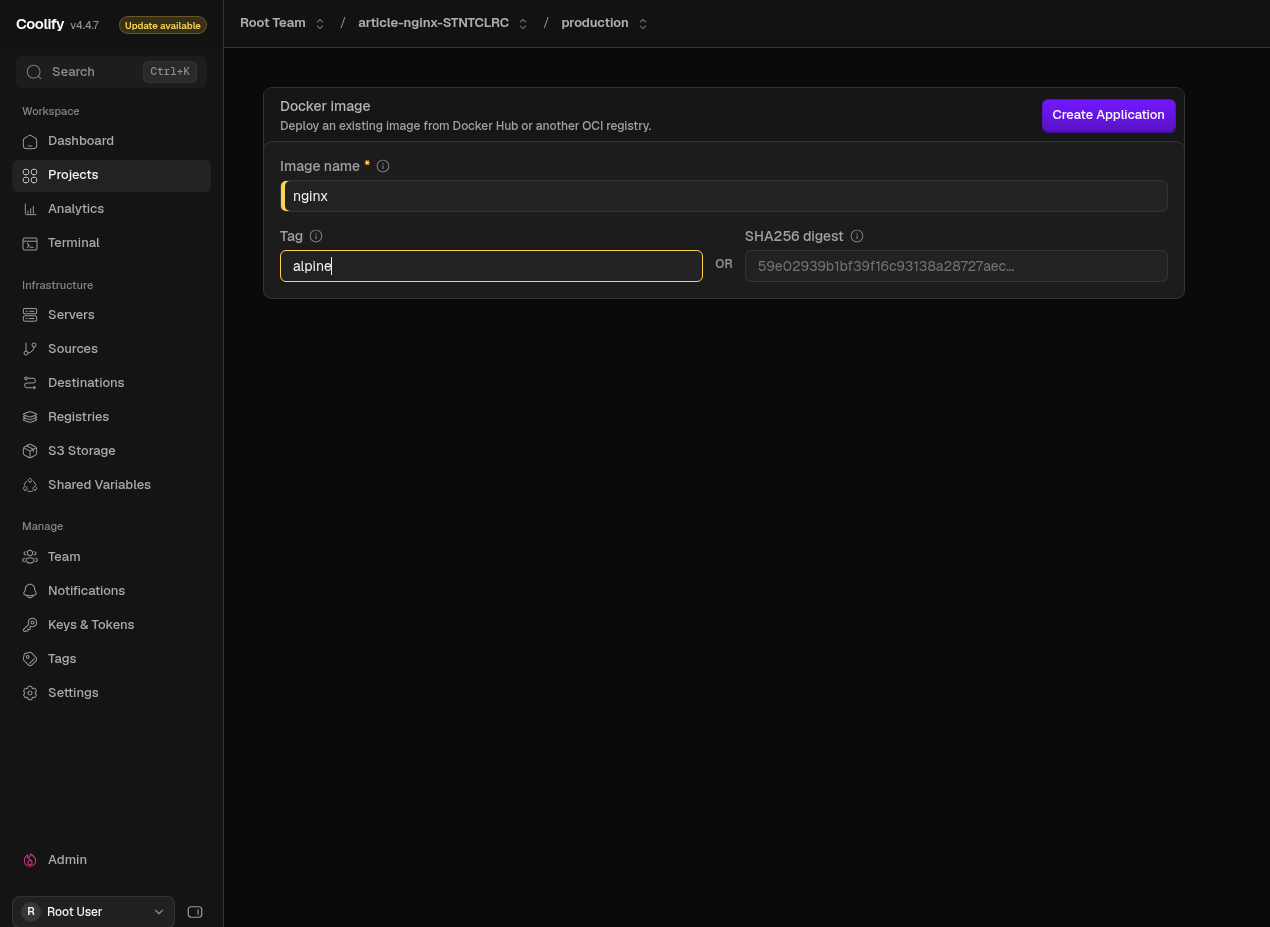
In the verified capture run, creating the project opened its production environment directly. From there, use New resource, search for Docker Image, and select that resource type. The capture run entered nginx in Image name and alpine in Tag.
click "New resource"
enter "Docker Image" into "Search resources"
click "Docker Image"
enter "nginx" into "Image name"
enter "alpine" into "Tag"
click "Create application"
Entering nginx:alpine directly into Image name is also supported by the current image parser and Coolify’s official deployment guide. The separate fields above match the form used in the screenshot run; they do not mean the combined image reference is incorrect. Do not use PRODUCTION as a navigation command here: it selected the environment breadcrumb in that run.
Step 4: Configure the Port and Deploy
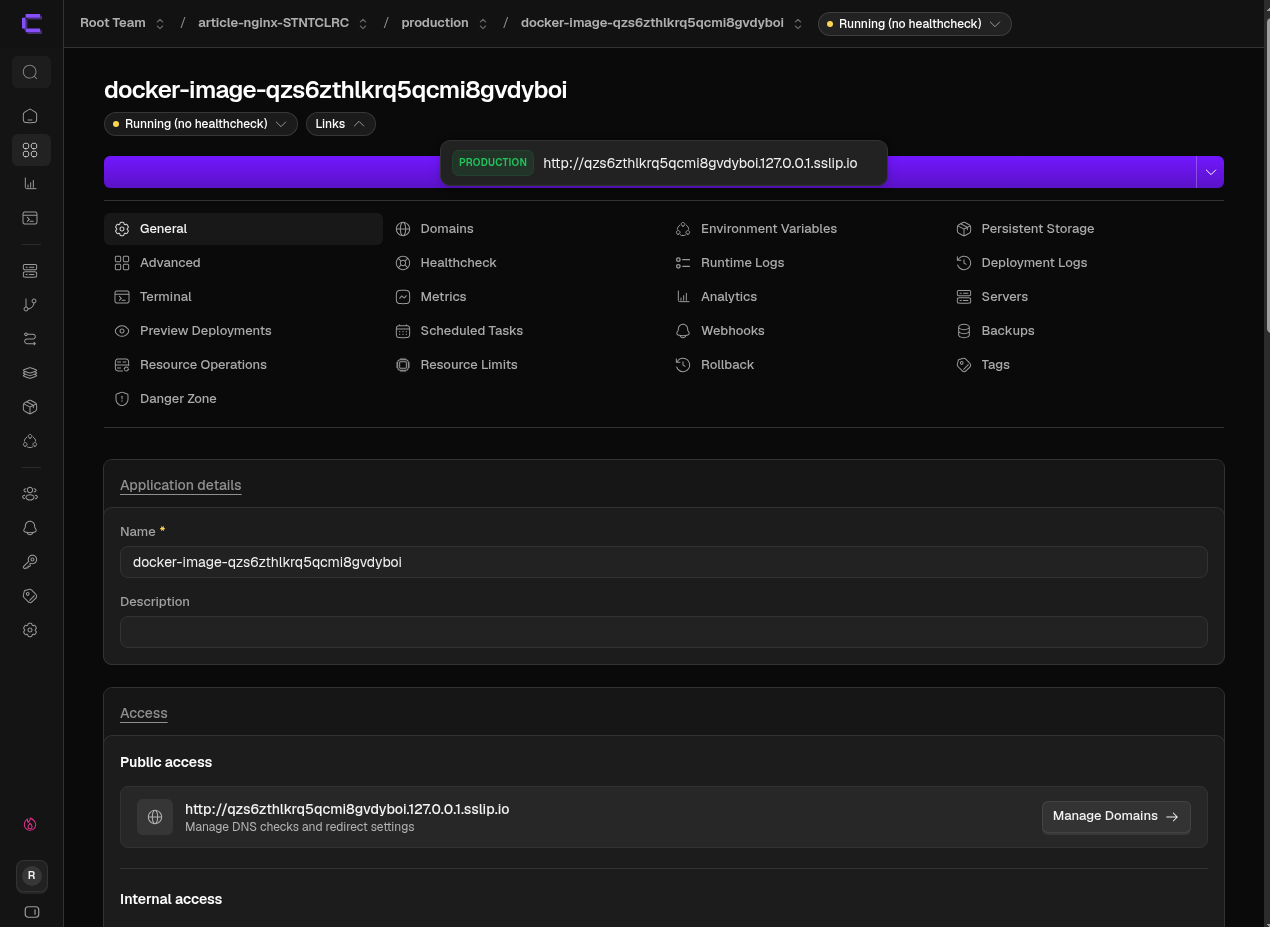
Wait until the newly created application’s configuration page has fully loaded before interacting with its settings. The five-second creation wait used in one capture attempt was insufficient. Nginx listens on port 80, and Ports exposes was already set to 80 in the tested instance, so the run did not need to enter that value again.
80 is confirmed, use the verified deployment command:click button exactly "Deploy"
The exactly qualifier matters: a less specific click "Deploy" selected Deployment Logs during a capture attempt. If your instance has a different exposed port, change it to 80 and select Save changes before deploying. Wait for the actual application configuration controls rather than relying on a fixed delay or checking an incomplete loading screen.
Step 5: Review the Deployment Result and Check HTTP Reachability Separately
The recorded test completed the Nginx Docker-image deployment and resource cleanup workflow, but it did not verify that the deployed web page was reachable. The generated application hostname contained 127.0.0.1.sslip.io; opening it returned ERR_CONNECTION_REFUSED. Because sslip.io resolves the embedded IP address, this hostname points to a loopback address rather than the intended publicly reachable server. The result does not, by itself, prove an Nginx or Coolify deployment defect.
The 12 passing regression tests establish the recorded administration and deployment actions, not external HTTP availability. In the separate capture work, the command open url stored value "applicationUrl" was verified for opening an already stored address. Automatically discovering and saving Coolify’s dynamically generated application URL remains unverified; the command cannot be assumed to extract it for you. The Nginx welcome page was not successfully reached, and there is no verified welcome-page screenshot.
To extend this check, configure a hostname that resolves to the correct deployment server, confirm the Coolify proxy is running, and check that the required inbound HTTP port is accessible. Coolify documents this process in its domain configuration guide. Once you have verified a reliable way to navigate to the deployed application’s URL, add a separate browser assertion that checks for the Nginx welcome page.
applicationUrl. Then this sequence can open that known address and check the page:open url stored value "applicationUrl" check that page contains "Welcome to nginx!"
Only the URL-opening syntax with a previously saved address was exercised in the separate capture; automatic URL extraction and the welcome-page assertion were not verified. Do not present the sequence as a passing test. Test navigation and page content separately so that a deployment success message cannot be mistaken for proof of public reachability.
Step 6: Remove the Test Resources Safely
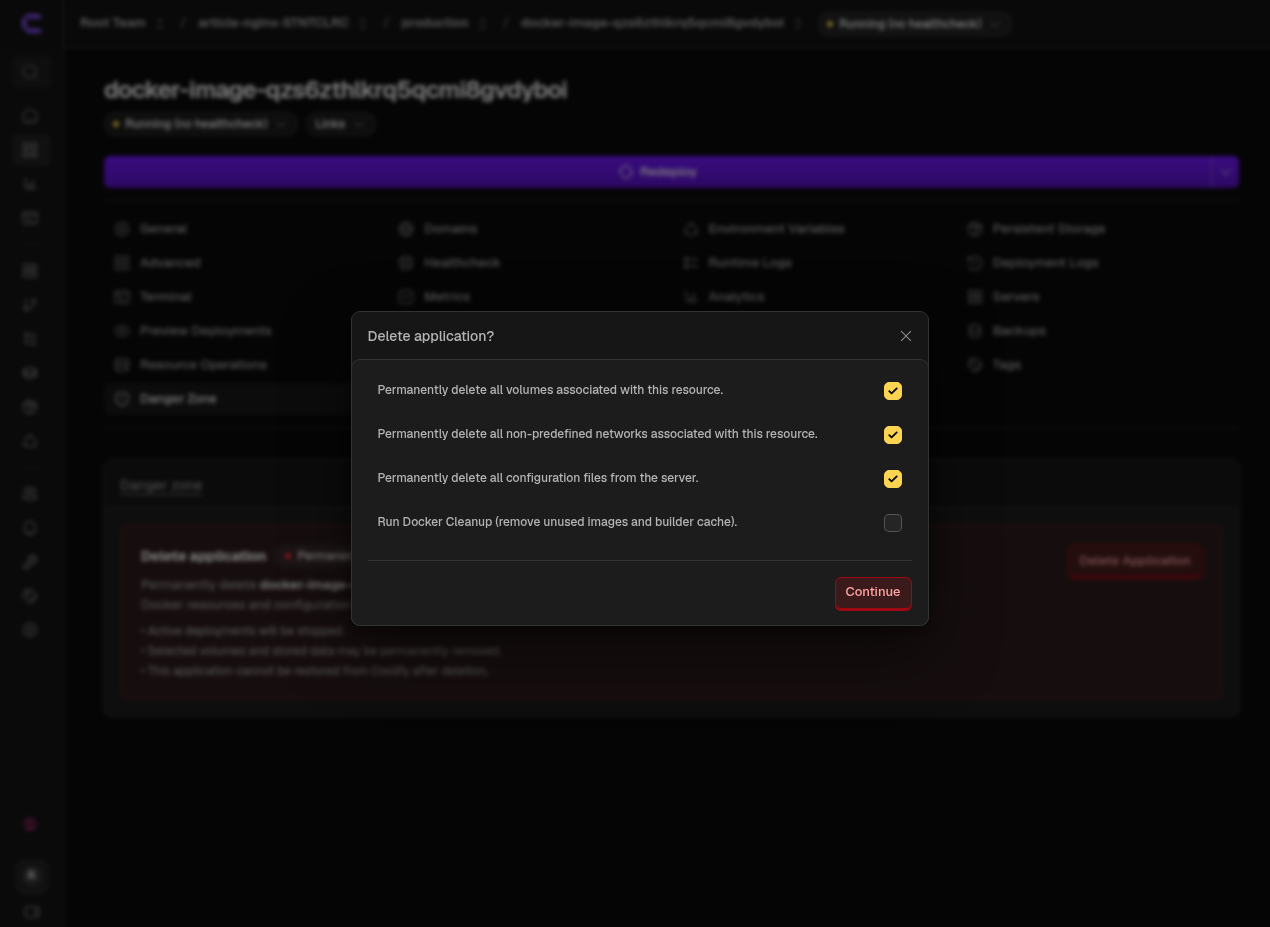
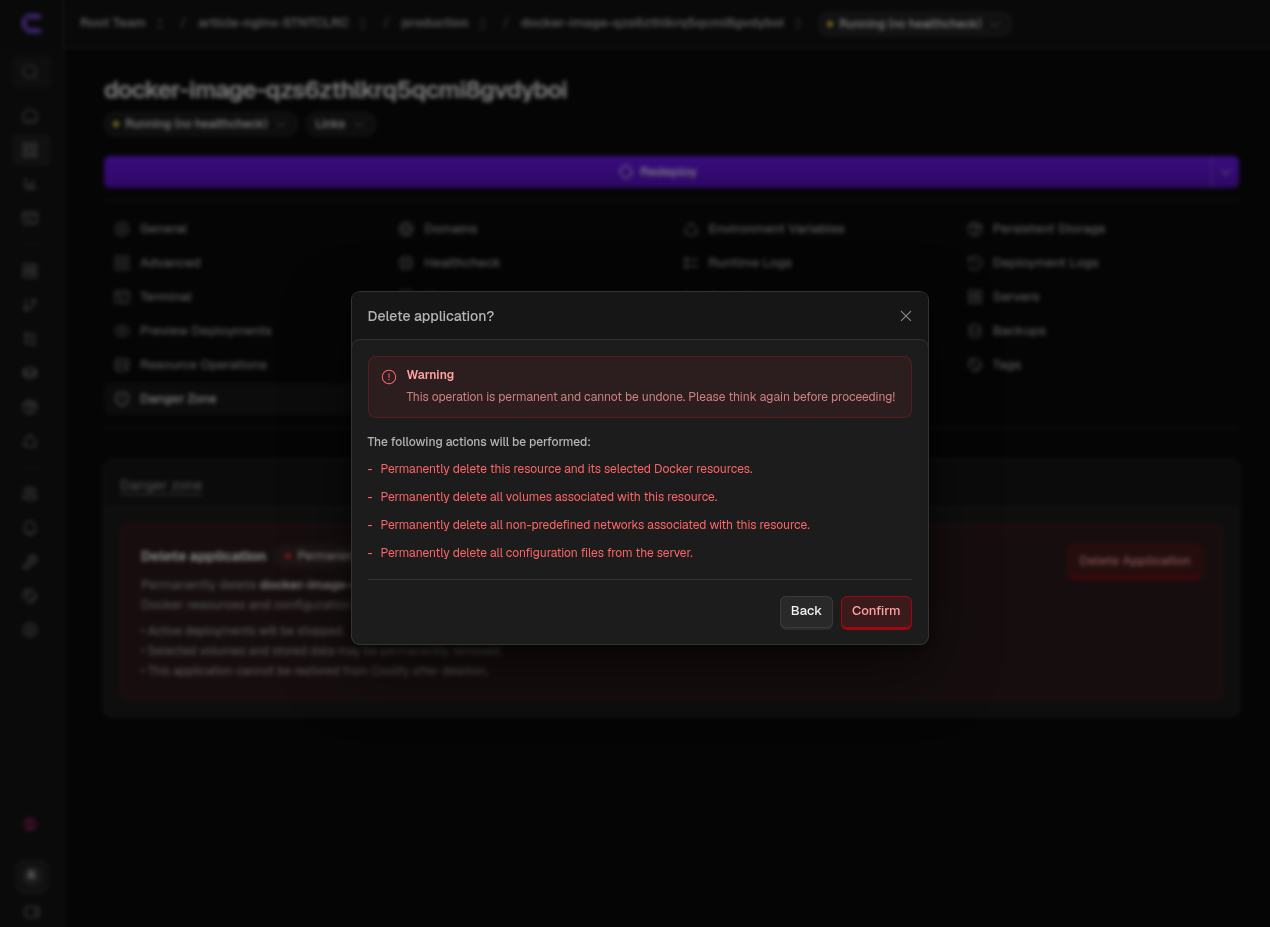
Remove temporary workloads even when the optional HTTP verification fails or the application URL is unreachable. The tested instance used the following deletion flow: select Delete Application, review the options, leave Run Docker Cleanup unchecked when unnecessary, select Continue, review the final confirmation, and select Confirm. The tested flow did not require entering an application name or password; follow any additional confirmation requirements shown by your installed version.
After deletion, verify that the application is no longer present in its project environment. Delete the temporary project as well if it is empty and safe to remove. A test that exits on an HTTP failure without cleanup can leave applications or containers behind on a persistent server.
Do not use broad commands such as docker system prune -a as a general test teardown procedure. A test should clean up its own resources without unexpectedly removing images or data used by other workloads.
Complete Example: Create and Verify a Project
The following shorter example contains only navigation and controls confirmed in Coolify’s project interface. It is useful as an initial smoke test before adding the deployment and deletion stages above.
login
click "Projects"
click "New project"
generate from template "coolify-e2e-********" and save as "projectName"
enter stored value "projectName" into "Name"
click "Create project"
check that page contains stored value from "projectName"
This example deliberately stops after creation; it is not a self-cleaning test. Add the project deletion steps verified in your installation before enabling repeated unattended runs.
Execution Results: A Verified 12-Test Coolify Suite
The example regression suite was executed through GitHub Actions on November 8, 2026. The uploaded JUnit report records 12 passed, 0 failed, and 0 skipped tests. The suite covers the following groups of workflows. The deployment case does not demonstrate that the generated Nginx URL was reachable:
| Area | Verified scenarios in the run | Cases |
|---|---|---|
| Authentication | Valid login; wrong password; logout and protected-page redirect | 3 |
| Projects and environments | Create/delete project; add/delete environment; rename/delete project | 3 |
| Credentials | Generate/rename/delete private key; create/revoke API token | 2 |
| Team configuration | Add/delete shared variable; create/switch/delete team; invite/revoke invitation | 3 |
| Deployment | Deploy Nginx from a Docker image and delete it (no public HTTP check) | 1 |
You can review the successful GitHub Actions run and the integration pull request. The run uploaded a JUnit report and CLI log as an artifact. The example testRigor suite is also available to browse.
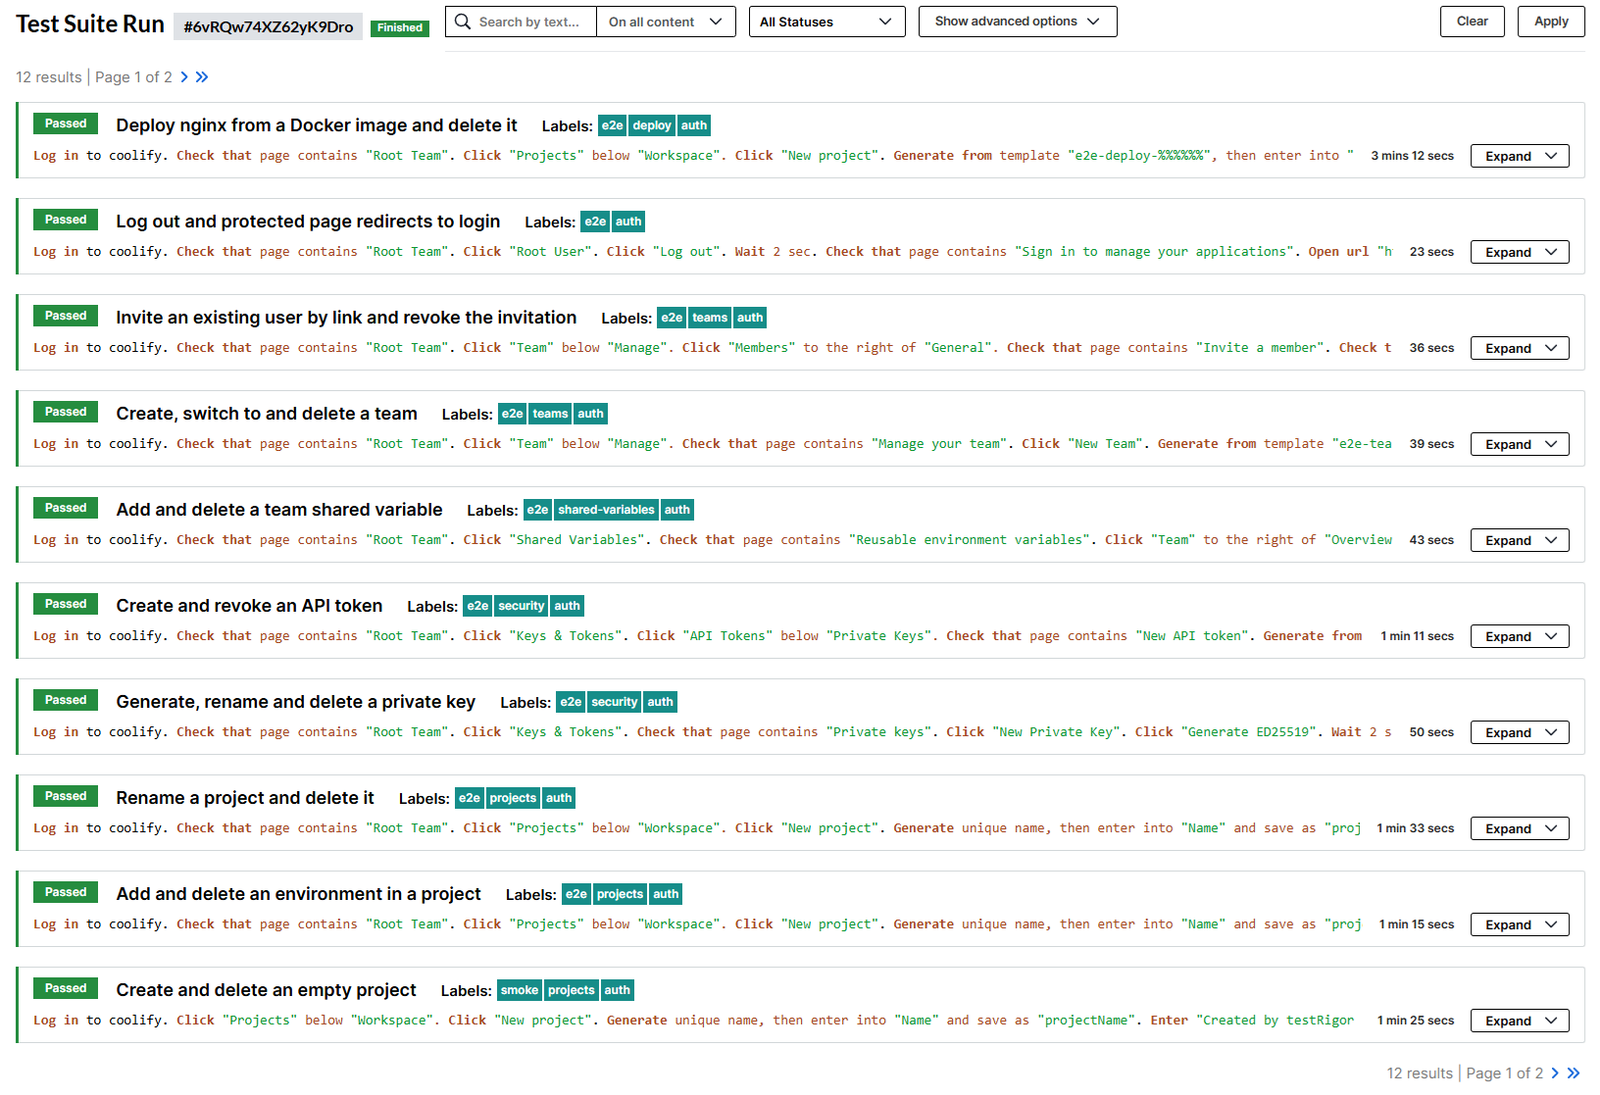
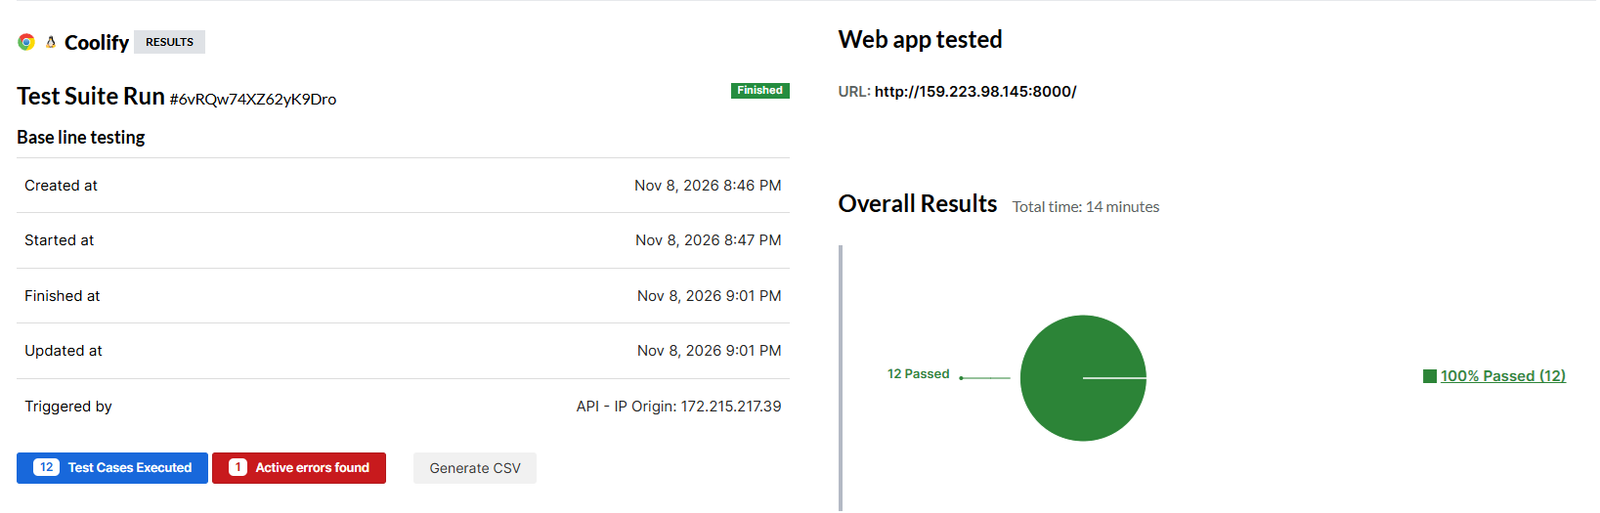
In testRigor, a reviewer can inspect the execution status and the individual steps, screenshots, and failure details available for a run. The GitHub Actions JUnit artifact provides a separate, machine-readable record. A successful report confirms the tested scenarios in that environment; it does not mean every Coolify feature or deployment configuration has been tested.
testRigor Capabilities Useful for Coolify
- Reusable Rules: keep repeated navigation and authentication actions in one place.
- Suite credentials and saved values: configure authentication in the suite and reuse generated project names as Test Data.
- Readable assertions: check visible results such as project names; when a reachable application URL is available, add a separate assertion for the Nginx welcome page.
- CLI and JUnit reporting: execute the hosted suite from a development workflow and retain test results for review.
For the available command syntax, see the testRigor language documentation and command-line documentation.
High-Value Coolify Testing Scenarios
Once the deployment smoke test is stable, expand coverage according to the risks of your instance. The cases below distinguish what the cited regression suite covers from valuable follow-up tests.
1. Verify Authentication and Access
Covered in the example suite: successful login, invalid password rejection, and logout followed by a protected-page redirect. These checks matter because Coolify can control production workloads and credentials.
Additional tests to consider: session expiration, multi-factor authentication when enabled, and a user who should not have permissions to delete a resource. A protected page should remain inaccessible after logout, not merely display a logout notification.
2. Verify Projects and Environments
Covered: create and delete an empty project, add and delete an environment, and rename and delete a project. Check that changes persist after revisiting the page and that a cleanup step does not affect unrelated projects.
Additional tests: environment-specific application configuration and permissions across multiple projects, particularly when several teams share one Coolify instance.
3. Verify Private Keys and API Tokens
Covered: generate, rename, and delete a private key; create and revoke an API token. These are sensitive workflows because they grant or maintain access to servers and automation.
Additional tests: confirm that a revoked token can no longer authenticate and that a low-privilege user cannot create credentials beyond their role. Do not expose raw token values in screenshots, test output, or publicly shared reports.
4. Verify Teams, Invitations, and Shared Variables
Covered: create, switch to, and delete a team; invite an existing user by link and revoke the invitation; add and delete a team-wide shared variable.
Additional tests: verify that a shared variable used by an application resolves to the intended value after a redeploy or restart. Coolify’s shared-variable documentation explains that creating a variable does not automatically inject it into every resource. A dashboard save and an actual running-container value are separate checks.
5. Verify More Than One Deployment Path
Covered: deploy an Nginx Docker image and delete the resource. This result does not include a verified HTTP request to the deployed application.
Additional tests: deploy an application from Git, change an environment variable, restart or redeploy it, verify domain routing and HTTPS, and confirm that failed deployments provide useful feedback. These scenarios should be added based on the deployment types your organization actually uses; they are not part of the verified 12-case result.
Reusable Rules for Coolify Testing
Repeated actions can become testRigor Reusable Rules. This is especially helpful when most cases need to sign in or reach the Projects page before performing their specific task.
For example, create a reusable rule named open Coolify projects with the navigation step below. Configure authentication separately using suite credentials and testRigor’s built-in login rule.
open Coolify projectsclick "Projects"
login
open Coolify projects
click "New project"
Keep resource-specific steps in their own rules only after those sequences work reliably. A short readable rule is easier to troubleshoot than a large abstraction that hides whether the failure happened during authentication, resource creation, or deployment.
Coolify Testing Tips for Reliable Automation
- Run state-changing tests carefully. When the same suite shares one account and instance, parallel logins or conflicting cleanup operations can interfere with each other. The example implementation selected sequential execution after login requests encountered HTTP 429 responses during parallel runs.
- Generate unique resource names. Reusing a project or team name can make later executions depend on leftover data.
- Check the result, not only the button. After saving a project, confirm that it persists. For deployments, distinguish the dashboard result from an additional HTTP reachability test. The latter requires a reachable domain and was not established in the cited execution.
- Expect asynchronous work. Image pulls, container startup, and proxy updates may take longer than dashboard navigation. Wait for meaningful results rather than relying on arbitrary fixed pauses.
- Respect access boundaries. Coolify permissions differ for projects, deployment operations, teams, and credentials. Use dedicated accounts for the behavior being tested.
- Keep cleanup targeted. Remove only resources created by the test and review any optional cleanup action that could affect the wider Docker host.
When to Run Your Coolify Testing Suite
Run a small smoke suite after a Coolify upgrade, a proxy or server-connection change, or a modification to authentication settings. Run the broader regression suite after changes to team permissions, project configuration, or deployment behavior, and on a regular schedule if the instance is business-critical.
Deployment tests are more expensive than a simple UI check, so prioritize critical operations and choose a schedule that your test environment can support. Leave enough time for each resource to finish deploying and for cleanup to complete before the next case runs.
Coolify Testing for Development Teams: GitHub Actions and CI/CD
You do not need GitHub Actions, Docker commands, or a local copy of Coolify’s source code to run the testRigor suite from its web interface. For teams already using CI/CD, however, the CLI can trigger the same hosted suite and save results as JUnit XML.
The referenced commit adds .github/workflows/testrigor-e2e.yml and tests/e2e/settings.json. The workflow uses TESTRIGOR_API_KEY as a repository secret and TESTRIGOR_SUITE_ID as a repository variable. It runs the hosted suite with sequential settings and verifies that the JUnit report has the configured expected number of cases (12 by default), with no failures or skips. It then publishes the JUnit report and CLI logs as an artifact. The cited November 8 run actually recorded 12 passing cases.
To reproduce the command locally, use a working checkout that contains tests/e2e/settings.json from the referenced commit, install Node.js and the testRigor CLI, and authenticate with a valid testRigor token. Assign your own suite ID and create the output directory before running the suite. The example below uses Bash; testrigor authenticate prompts for a token rather than placing it in the article or shell command.
npm install --global @testrigor/testrigor-cli@2.0.9
testrigor authenticate
SUITE_ID="YOUR_TESTRIGOR_SUITE_ID"
mkdir -p test-results
testrigor test-suite run "$SUITE_ID" \
  --settings-path tests/e2e/settings.json \
  --junit-report-save-path test-results/junit.xml
The supplied settings file uses useParallelCombinator: false and a batch size of one to keep execution sequential. The full workflow runs on same-repository pull requests to main, pushes to main, or manual dispatch. It skips gracefully when the required credentials are absent, and its pull-request job excludes external fork PRs.
Do not confuse a green CI job with validation of a code change. This particular workflow launches tests against the existing instance configured in testRigor. To test a pull request’s code, a separate process would need to deploy that revision into an isolated environment and point the suite at it.
Additional Resources
- Coolify documentation
- Coolify: Deploy your first application
- testRigor language documentation
- testRigor CLI documentation
- End-to-end testing guide
Conclusion
Coolify testing should protect the operations that keep applications available and infrastructure manageable. Unit and integration tests catch important problems within the platform, while end-to-end tests verify what administrators can accomplish through the interface.
Begin with a reliable administration journey: create a temporary project, deploy an Nginx image, and remove the test resources safely. Then add a separate HTTP reachability test once the application has a correctly configured, accessible hostname. Expand into authentication, environments, team access, credentials, and the deployment paths your organization uses most. This builds practical regression coverage without confusing a successful deployment operation with a publicly reachable application.
| Achieve More Than 90% Test Automation | |
| Step by Step Walkthroughs and Help | |
| 14 Day Free Trial, Cancel Anytime |