Open HRMS Testing
|
|
OpenHRMS is an open-source Human Resource Management suite (built on Odoo) that centralizes employee data, attendance, leave, timesheets, payroll, recruitment, appraisals, and expenses. Its modular apps and extensible workflows scale from startups to enterprises. An ideal way to validate these experiences is by using testRigor for end-to-end testing.
In the following section will be discussed the main testing types for forging a solid testing strategy for your Open HRMS application:
End-to-end testing
End-to-end testing involves testing an application’s entire workflow from start to finish to ensure that it performs as intended and meets the requirements. End-to-end testing is also known as system testing or acceptance testing.
In end-to-end testing, testers simulate real-world scenarios, including multiple modules or components, to validate the application’s functionality, reliability, and performance. This testing method verifies that all the modules or components of the application work together as intended and that the application as a whole meets the desired quality standards.
- Selenium-based tools
- TestCafe
- testRigor
Selenium-based tools
Selenium is a legacy open-source tool that is still widely used for system testing. Most tools out there that are based on Selenium tend to offer features that might benefit your project. However, each of these tools does inherit some of the drawbacks that Selenium has, though they try to overcome them.
TestCafe
TestCafe is an open-source end-to-end testing tool for web applications. It is designed to simplify the process of creating and running automated tests for web applications across different browsers and platforms.
TestCafe can be used on Windows, macOS, and Linux operating systems, and it supports various web browsers such as Google Chrome, Mozilla Firefox, and Microsoft Edge. The tool is built on top of Node.js and uses JavaScript as the scripting language, which makes it easy for developers to write and maintain test scripts.
TestCafe provides several features and tools to simplify the testing process, including automatic waiting for page loads and element visibility, automatic parallel testing across multiple browsers, and built-in support for continuous integration.
testRigor
testRigor is a unique tool here since it is the only one that allows manual QA testers to build lengthy end-to-end tests. Even more so, they can do it much faster than QA engineers can write Selenium code, while spending a lot less time on test maintenance. This is possible due to testRigor’s AI engine and a handful of smart features.
- Readable tests your team (and Drupal contributors) can review.
- Resilient element targeting by visible text, labels, and relative anchors.
- Zero local browser infra; run locally or inside CI (we tunnel localhost for PR checks).
- Artifacts (video, screenshots, JUnit) for fast triage.
Setting up test suite
There are several ways to set up OpenHRMS. You can run it with Docker by launching Odoo + PostgreSQL and mounting the OpenHRMS addons directory, or you can add the OpenHRMS modules to an existing Odoo deployment (via Apps / addons_path) and install them from the Apps list. Either approach gives you a working HR suite; once the admin logs in and completes basic configuration, you can begin testing with testRigor. For that, the first step is to set up your test suite, as shown below:
Step 1: Log in to your testRigor app with your credentials.
- Test Suite Name: Provide a relevant and self-explanatory name.
- Type of testing: Select from the following options: Desktop Web Testing, Mobile Web Testing, Native and Hybrid Mobile, based on your test requirements.
- URL to run test on: Provide the application URL that you want to test.
- Testing credentials for your web/mobile app to test functionality which requires user to login: You can provide the app’s user login credentials here and need not write them separately in the test steps then. The login functionality will be taken care of automatically using the keyword login.
- OS and Browser: Choose the OS Browser combination on which you want to run the test cases.
- Number of test cases to generate using AI: If you wish, you can choose to generate test cases based on the App Description text, which works on generative AI.
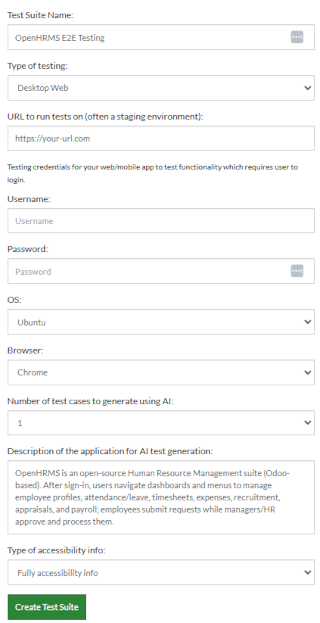
Step 3: Click Create Test Suite.
On the next screen, you can let AI generate the test case based on the App Description you provided during the Test Suite creation. However, for now, select do not generate any test, since we will write the test steps ourselves.
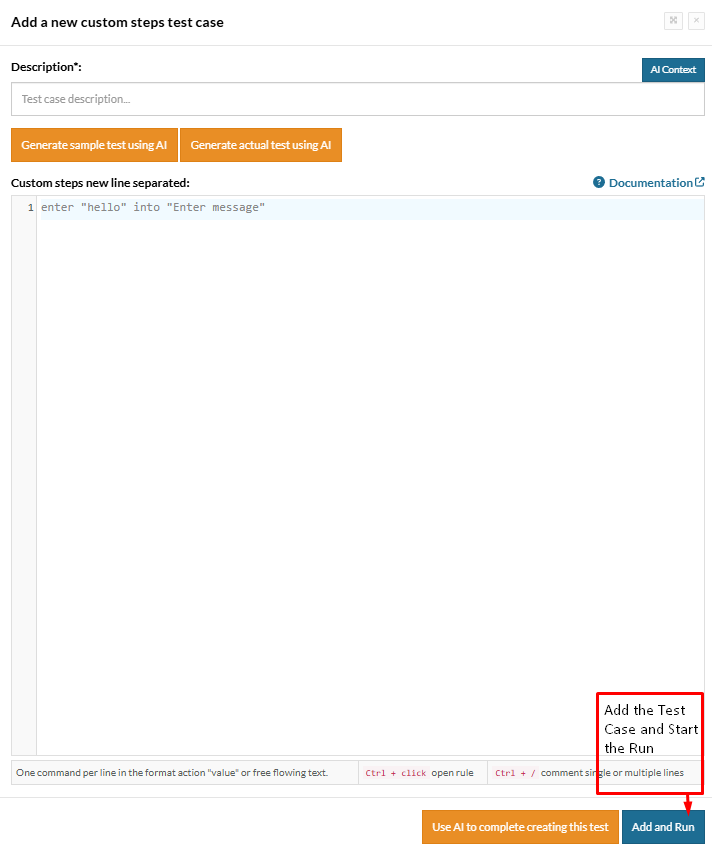
Step 4: To create a new custom test case yourself, click Add Custom Test Case.

Step 5: Provide the test case Description and start adding the test steps.
- Login to the application;
- Create a new section;
- Configure the new section.
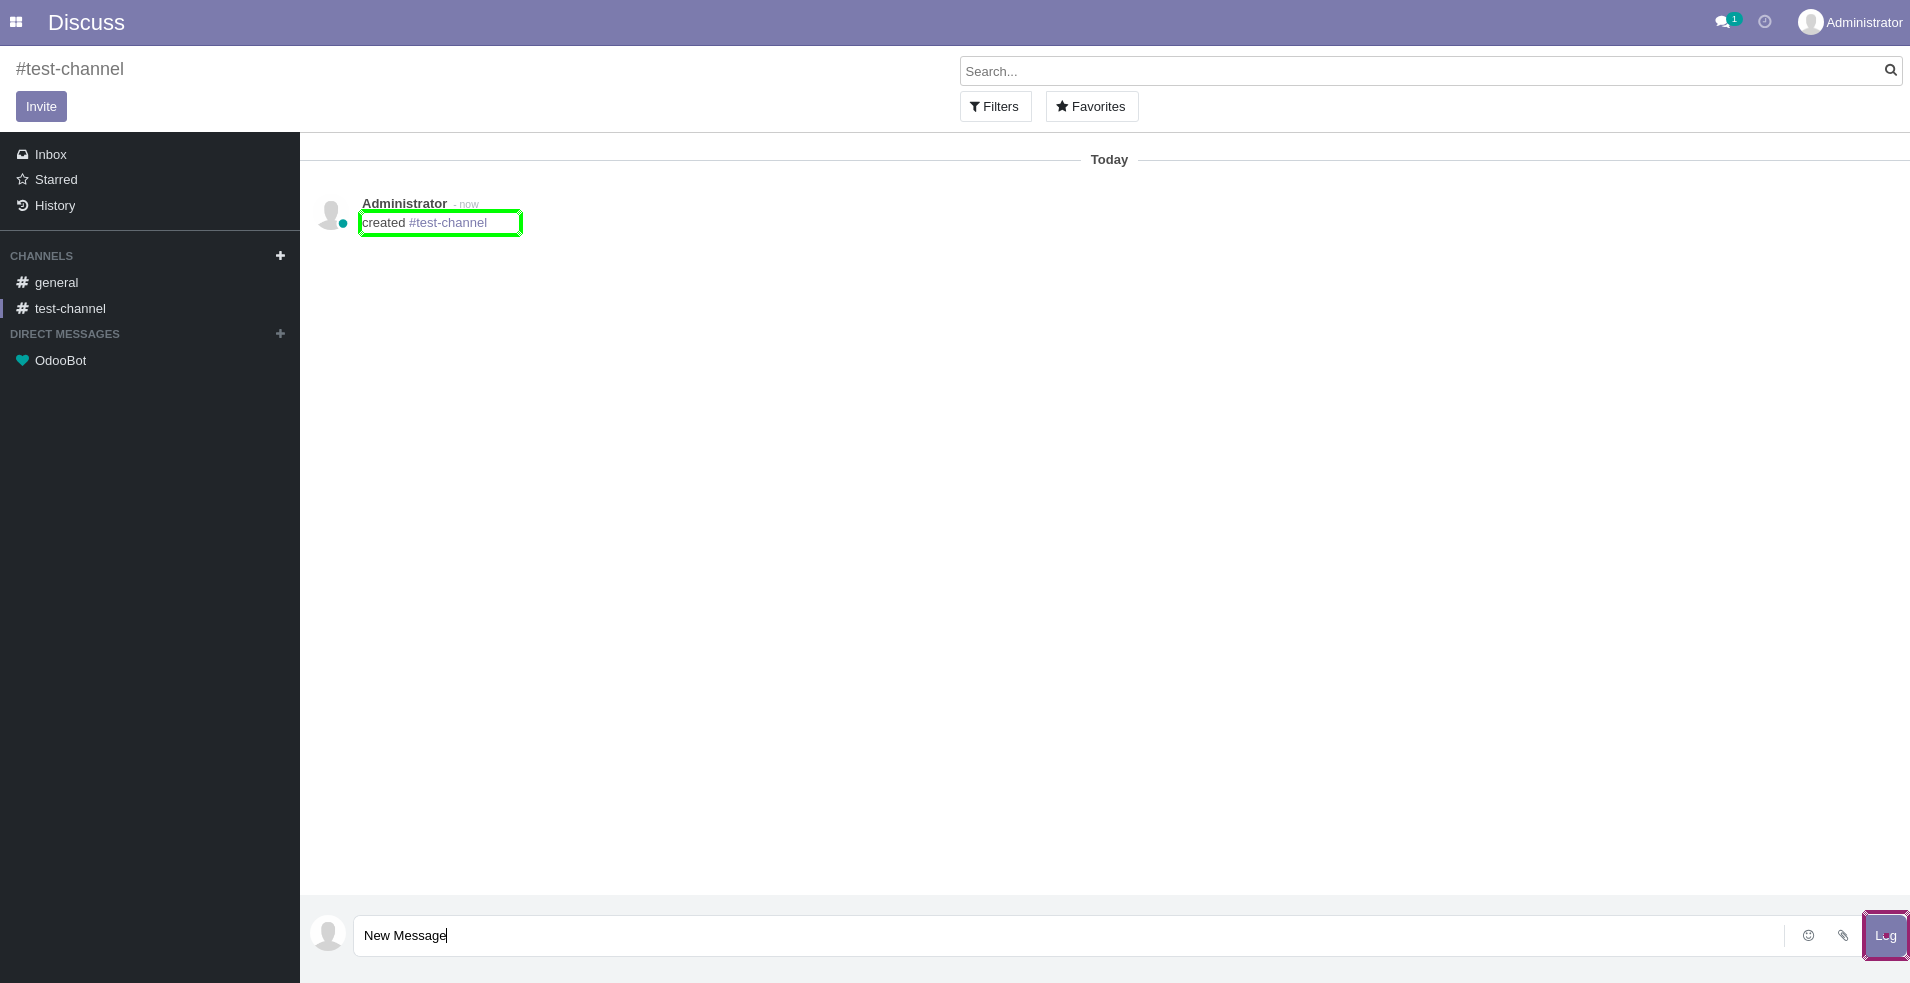
Test Case- Discuss: Creating new channel and messages log
Step 1: We will add test steps on the test case editor screen one by one.
testRigor automatically navigates to the website URL you provided during the Test Suite creation. There is no need to use any separate function for it. Here is the website homepage, which we intend to test.
To have access to the main page, we need to login to our account. For that, testRigor has a built-in reusable rule “login”, that will use the variables “Username” and “Password” defined in the test suite creation to perform the login function.
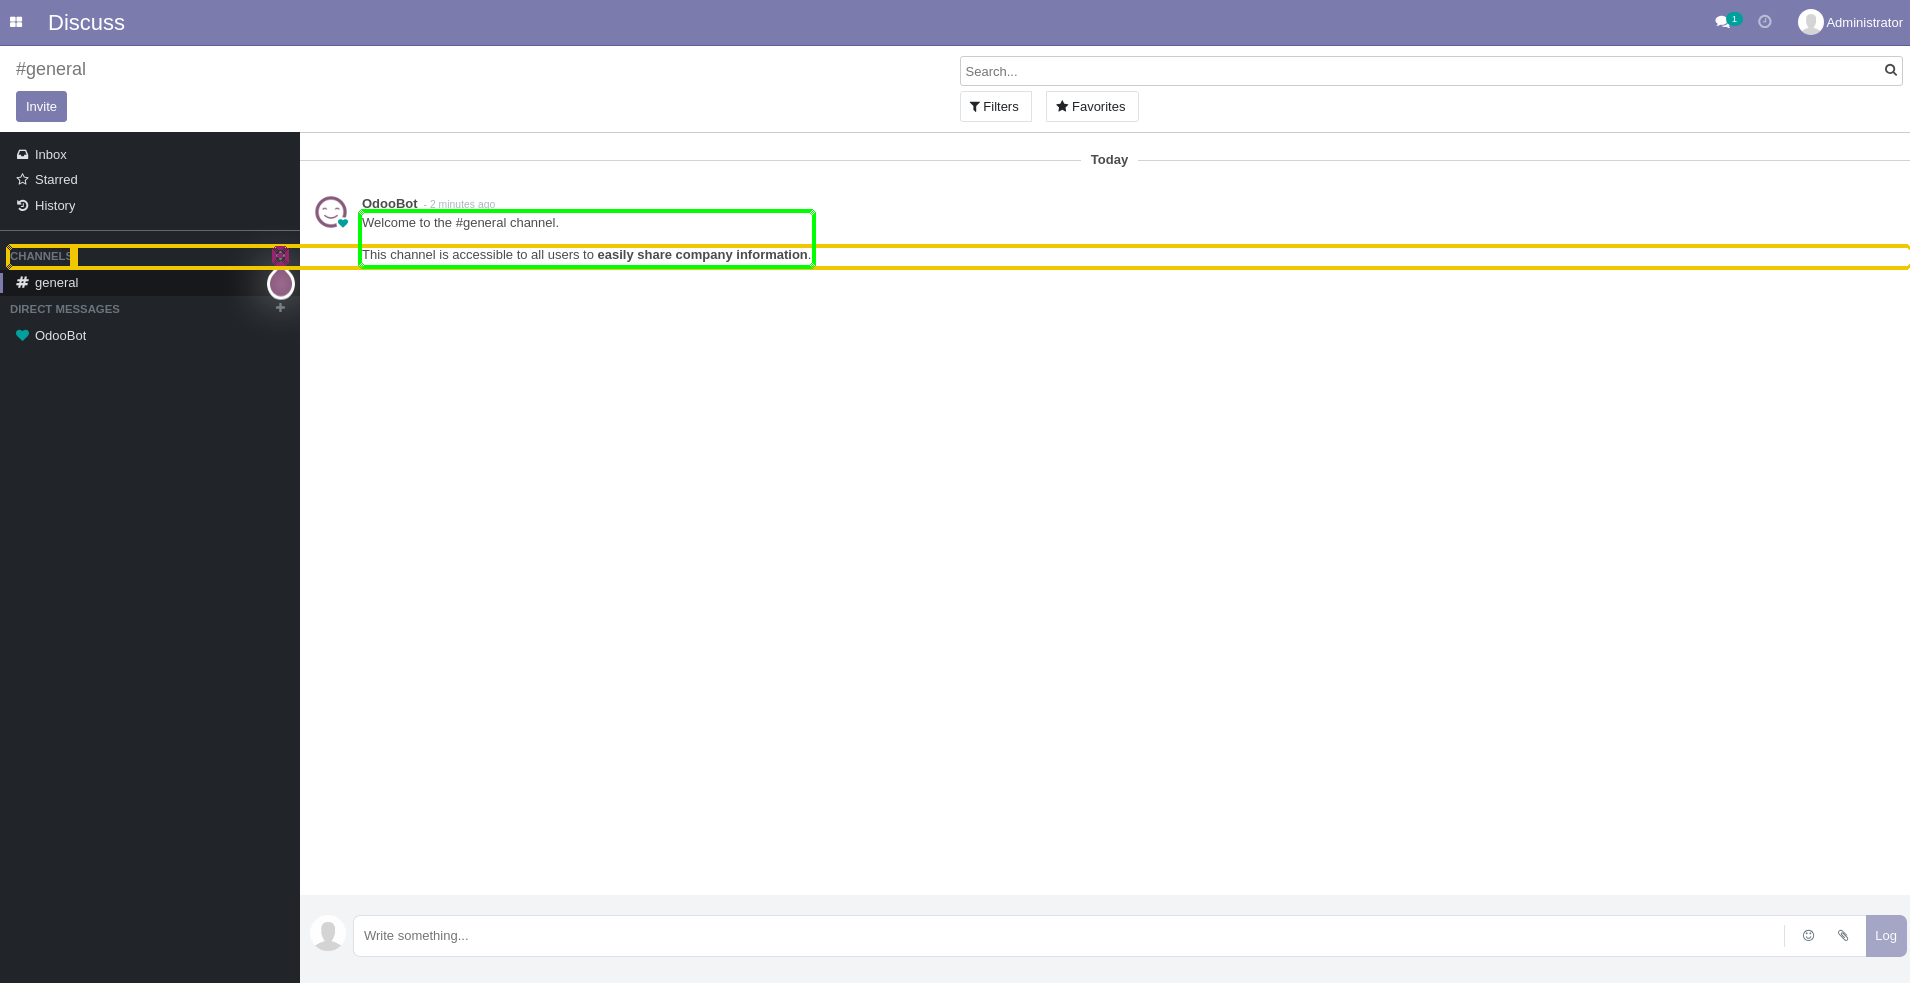
login
click button on the left of "Discuss"
click "Discuss"
click "general"
check that page contains "Welcome to the #general channel."
click first button on the right of "CHANNELS"
type "test-channel"
check that page contains "test-channel"
type enter
check that page contains "created"
type "New Message"
click "Log"
check that page contains "New Message" roughly above "Log"
hover over "test-channel"
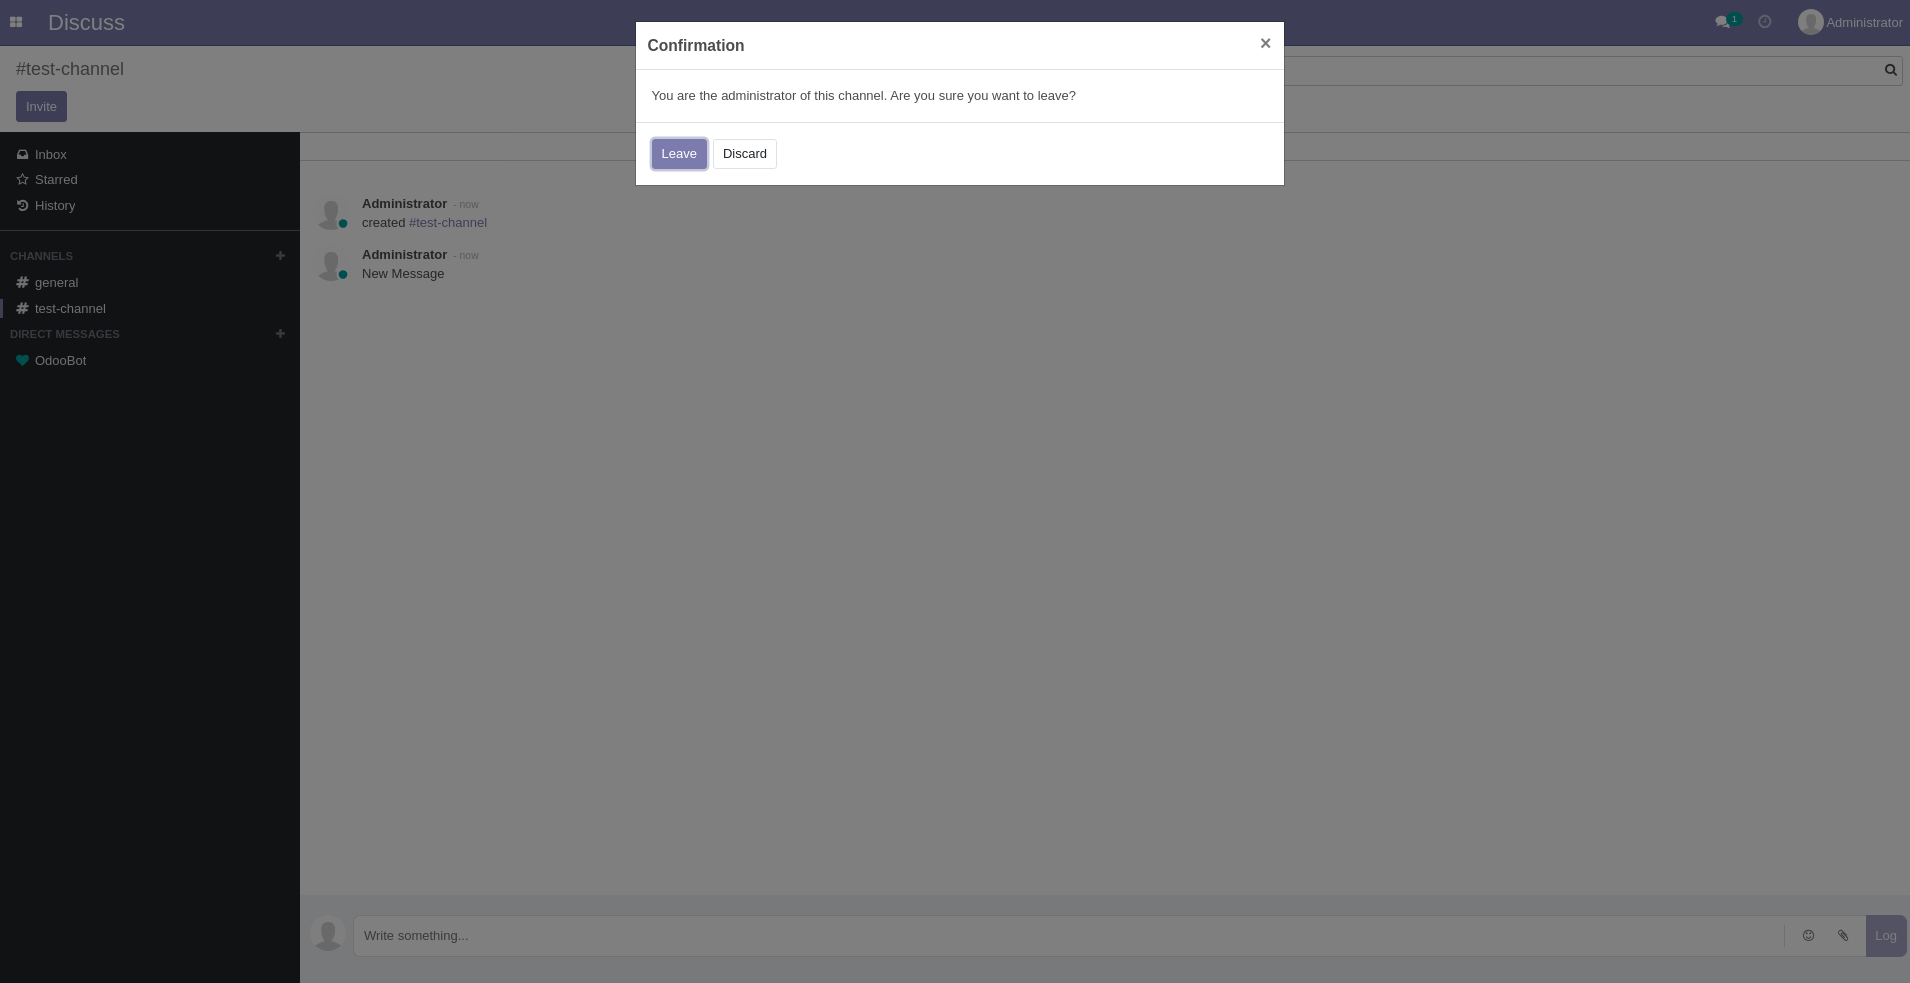
click second button on the right of "test-channel" with offset "20,10"
click "leave" on the left of "discard"
check that page does not contain "test-channel"
Complete Test Case
login
click button on the left of "Discuss"
click "Discuss"
click "general"
check that page contains "Welcome to the #general channel."
click first button on the right of "CHANNELS"
type "test-channel"
check that page contains "test-channel"
type enter
check that page contains "created"
type "New Message"
click "Log"
check that page contains "New Message" roughly above "Log"
hover over "test-channel"
click second button on the right of "test-channel" with offset "20,10"
click "leave" on the left of "discard"
check that page does not contain "test-channel"
Click Add and Run.
Full Suite’s Test Cases
This section will present an example of a few tests that may comprise a OpenHRMS’ test suite.
Prerequisites
For the test suite to run properly, there is one step we must take before running the test cases, which is the Reusable Rules.
Reusable Rules
The reusable rules are a set of custom steps that can be inserted in any test just by using the rule’s name. In this suite, there will be two reusable rules:
RR: Delete Test Job Position
click button on the right of "Test Position"
click "edit"
click "discard" on the right of "save"
click "action"
click "delete"
click "Ok" on the left of "Cancel"
check that page contains "Let's create a job position."
RR: Creation of New Test Job Position
click "create" below "Job Positions"
type "Test Position"
click "Create" on the left of "Discard"
click button on the right of "Test Position"
click "Edit"
click second "Job Description"
type "Test Position for seniors located in USA"
click "Recruitment" on the right of "Job Description"
select "Administration" from first dropdown on the right of "Department"
click "Save" on the left of "Discard"
click "Job Positions"
check that page contains "Test Position"
Now, we can proceed with the test cases:
Recruitment: Creating and deleting Test Job Positions
login
click button on the left of "Dashboard"
click "Recruitment"
RR: Creation of new Test Job Position
RR: Delete Test Job Position
Recruitment: Creating and progressing Applications
login
click button on the left of "Discuss"
click "Recruitment"
RR: Creation of new Test Job Position
click second button "Applications"
click "create"
enter "Manager" into first "name"
enter "John Doe" into second "name"
enter "testemail@test.com" into "email"
generate from template "###-###-####", then enter into "Phone"
select "Bachelor Degree" from dropdown "Degree"
click "save" on the left of "discard"
click "application" on the right of "job positions"
check that page contains "John Doe" below "Initial Qualification"
drag "John Doe" to "Second Interview"
check that page contains "John Doe" below "Second Interview"
click "Recruitment"
RR: Delete Test Job Position
Attendances: Check in and check out validation
login
click button on the left of "Discuss"
click "Attendances"
check that page contains "Welcome!"
click first button below "Welcome"
check that page contains string with parameters "Checked in at ${nowHourTwoDigits}"
click "Ok"
click first button below "Want to check out?"
check that page contains string with parameters "Checked out at ${nowHourTwoDigits}"
click "Goodbye"
check that page contains "Welcome!"
Calendar: Creating and editing a new meeting
login
click button on the left of "Discuss"
click "Calendar"
click table
type "Meeting X"
click "create" on the left of "edit"
click "Meeting X"
click "edit" on the left of "delete"
enter "2" into "duration"
click "options" on the right of "meeting details"
enter "1" into "recurrent"
select "days" from dropdown on the right of "repeat every"
select "forever" from dropdown on the right of "until"
click "save" on the left of "discard"
click "Today"
click "Month" on the right of "Today"
check that page contains "Meeting X" below "Monday"
check that page contains "Meeting X" below "Tuesday"
check that page contains "Meeting X" below "Wednesday"
click first "Meeting X"
click "edit" on the left of "delete"
click "All Events"
click "options" on the right of "meeting details"
enter "0" into "recurrent"
click "save" on the left of "discard"
click "Meeting X"
click "delete" on the right of "edit"
click "ok" on the left of "cancel"
check that page does not contain "Meeting X"
Preferences: Request sick time off
login
click button on the left of "Discuss"
click "Time off"
check that page does not contain "Sick time off"
click "New time off"
select "Sick Time Off" from first dropdown
save expression "${todayDayOfMonth} + 1" as "nextDay"
save expression "${todayDayOfMonth} + 2" as "nextDay2"
click first "input" on the right of "from"
click exactly stored value "nextDay"
click second "input" on the right of "from"
click exactly stored value "nextDay2"
click "save" on the left of "discard"
check that page contains "Sick time off"
click third "Sick Time Off"
click "delete"
click "Ok"
check that page does not contain "Sick time off"
Employees: Creating new department
This test case will go through the process of creating a new employee’s department. Test Execution.
login
click button on the left of "Discuss"
click "Employees"
click "departments"
check that page does not contain "Marketing"
click "create"
type "Marketing"
select "Administrator" from dropdown on the right of "manager"
select "Sales" from dropdown on the right of "Parent department"
click "Save"
click "Departments"
check that page contains "Marketing"
click first button on the right of "Marketing" and on the left of "Sales"
click "configuration" roughly below "Departments"
click "discard"
click "action"
click "delete"
click "ok"
click "Departments"
check that page does not contain "Marketing"
Invoicing: Creating a new Journal
login
click button on the left of "Discuss"
click "invoicing"
click "configuration"
click "Journals"
click "create"
enter "JournalX" into "name"
select "sales" from first dropdown on the right of "type"
enter "123" into "short code"
click "Save" on the left of "Discard"
click "Journals"
check that page contains "JournalX"
click "JournalX"
click "action"
click "delete"
click "Ok" on the left of "Cancel"
check that page does not contain "JournalX"
Invoicing: Creating a new vendors product
login
click button on the left of "Discuss"
click "invoicing"
click "vendors"
click "products"
click "create" below "products"
enter "Book" into "product name"
click "Save" on the left of "Discard"
click "vendors"
click "products"
check that page contains "Book"
click "Book"
click "action"
click "delete"
click "Ok" on the left of "Cancel"
check that page does not contain "Book"
Payroll: New payslip batch
login
click button on the left of "Discuss"
click "payroll"
click "payslips batches"
click "create"
enter "batch X" into "name"
click dropdown on the right of "salary journal"
type "journal Y"
click "save"
click "create"
select "sales" from dropdown "type"
enter "456" into "short code"
click "save"
click "save"
click "payslips batches"
click button on the right of "batch X"
click "edit"
click "discard" on the right of "save"
click "action"
click "delete"
click "Ok" on the left of "Cancel"
check that page does not contain "batch X"
Execution Results
Once the test is executed, you can view the execution details, such as execution status, time spent in execution, screenshots, error messages, logs, video recordings of the test execution, etc. In case of any failure, there are logs and error text that are available easily in a few clicks.
You can also download the complete execution with steps and screenshots in PDF or Word format through the View Execution option.
testRigor’s Capabilities
- Reusable Rules (Subroutines): You can easily create functions for the test steps that you use repeatedly. You can use the Reusable Rules to create such functions and call them in test cases by simply writing their names. See the example of Reusable Rules.
- Global Variables and Data Sets: You can import data from external files or create your own global variables and data sets in testRigor to use them in data-driven testing.
- 2FA, QR Code, and Captcha Resolution: testRigor easily manages the 2FA, QR Code, and Captcha resolution through its simple English commands.
- Email, Phone Call, and SMS Testing: Use simple English commands to test the email, phone calls, and SMS. These commands are useful for validating 2FA scenarios, with OTPs and authentication codes being sent to email, phone calls, or via phone text.
- File Upload/ Download Testing: Execute the test steps involving file download or file upload without the requirement of any third-party software. You can also validate the contents of the files using testRigor’s simple English commands.
- Database Testing: Execute database queries and validate the results fetched.
testRigor enables you to test web, mobile (hybrid, native), API, and desktop apps with minimum effort and maintenance.
Additional Resources
- Access testRigor documentation to know about more useful capabilities
- Top testRigor’s features
- How to perform end-to-end testing
Setting up GitHub CI/CD Integration
For automated testing in your GitHub repository, you’ll need to configure your testRigor credentials as GitHub secrets. This approach differs from local testing by using GitHub’s secure environment variables instead of a local .env file.
Step 1 – Add GitHub Secrets
- Go to your GitHub repository
- Click on “Settings” → “Secrets and variables” → “Actions”
- Add the following:
- As a secret:
- OpenHRMS_AUTH_TOKEN: Your testRigor auth token (keep this private)/li>
- As variables:
- OpenHRMS_TEST_SUITE_ID: Your testRigor Test Suite ID
- OpenHRMS_BASE_URL: Your OpenHRMS website URL
- As a secret:
For further information on creating secrets and variables in GitHub Actions, you can check the official GitHub documentation on secrets and variables.
Required GitHub Secrets and Variables:
- OpenHRMS_TEST_SUITE_ID: Your testRigor Test Suite ID (e.g., 12345)
- OpenHRMS_AUTH_TOKEN: Your testRigor auth token (format: ########-####-####-####-############)
- OpenHRMS_BASE_URL: Your OpenHRMS website URL (e.g., <a href=”https://yourstore.com”>https://yourstore.com</a>)
Step 2- Use in GitHub Actions
- name: Run testRigor Tests
  run: bin/mftf run:testrigor
  env:
    OpenHRMS_AUTH_TOKEN: ${{ secrets. OpenHRMS_AUTH_TOKEN }}
    OpenHRMS_TEST_SUITE_ID: ${{ vars. OpenHRMS_TEST_SUITE_ID }}
    OpenHRMS_BASE_URL: ${{ vars. OpenHRMS_BASE_URL }}
Key Difference: While local testing uses a .env file, CI/CD uses GitHub’s secure secret management system, ensuring your credentials are encrypted and only accessible to authorized workflows.
Troubleshooting Tips
- Make sure your OpenHRMS site is running and accessible at the URL you specified
- Check your .env file – ensure all three values are correct and there are no extra spaces
- Verify your testRigor account – make sure you can log in and see the test suite
- Check your internet connection – testRigor needs to download some tools on first run
If you need to start over, simply delete the .mftf-tools folder and run the command again.
Conclusion
With OpenHRMS, you can centralize HR operations (employees, attendance/leave, timesheets, expenses, recruitment, and payroll) and move from installation to productive workflows quickly. To keep those processes reliable at scale, pair the suite with end-to-end automation: testRigor lets you write resilient, plain-English tests and run them in CI with clear artifacts. Before adopting, map your critical employee/manager/HR journeys and coverage needs, then choose the setup that best fits your team and infrastructure.
| Achieve More Than 90% Test Automation | |
| Step by Step Walkthroughs and Help | |
| 14 Day Free Trial, Cancel Anytime |